Apple Pay
Description
Apple Pay provides an easy and secure way to make payments in iOS, iPadOS, and watchOS apps, and on websites in Safari. With the standard integration, the merchant handles the Apple Pay setup on their own frontend — including merchant identifiers, certificates, and tokenization — and sends the decrypted card data to OneAPI for payment processing.
Availability
Apple Pay is available in over 70 countries and territories worldwide. Supported card networks: Visa and Mastercard.
Transaction Types
The following transaction types are currently available:
Integration
With our Managed Apple Pay integration, we handle everything for you — Apple Pay merchant identifiers, certificates, frontend button rendering, and tokenization — all through the hosted payment page. No Apple Pay API integration required on your side. See Managed Apple Pay Integration in Optional Services.
The merchant handles all Apple Pay setup independently and sends the decrypted card data to OneAPI for payment processing.
Merchant Responsibilities
The following are managed entirely by the merchant and are out of scope of OneAPI:
- Apple Pay merchant identifier registration and configuration
- Payment processing certificate creation and management
- Merchant validation (domain verification)
- Frontend integration with the Apple Pay API (rendering the Apple Pay button, handling the payment sheet)
- Receiving and decrypting the Apple Pay payment token
For details on these steps, refer to the official Apple Pay documentation.
What OneAPI Handles
Once the merchant has decrypted the Apple Pay token and extracted the card data, OneAPI is responsible for:
- Processing the payment request with the decrypted card data
- Handling 3DS authentication when required
- Returning the transaction result
- Sending postback notifications with the final payment status
Prerequisites
Before integrating Apple Pay in Unmanaged mode, the merchant must complete the following steps:
- Enroll in the Apple Developer Program — A paid membership ($99 USD/year) is required to access Apple Pay configuration. Enroll at https://developer.apple.com/programs/.
- Create a Merchant Identifier — Register a unique merchant identifier in the Apple Developer Portal. This identifier is used across all Apple Pay certificates and sessions.
- Create a Payment Processing Certificate — Generate a CSR, upload it to Apple, and download the certificate. This is used to decrypt Apple Pay payment tokens on your server.
- Create a Merchant Identity Certificate (web only) — Required for TLS mutual authentication during merchant validation on the web. Not needed for in-app integrations.
- Register and verify your domain — Each domain where the Apple Pay button is displayed must be verified by hosting Apple's verification file.
- Complete onboarding with our platform — Contact your onboarding manager to enable Apple Pay processing for your merchant account. You will receive confirmation that your account is configured to accept
payment_type: "applepay"requests. - Integrate the Apple Pay API on your frontend — Implement the Apple Pay button, merchant validation, and token handling on your website or app.
For detailed step-by-step instructions on completing the prerequisites above, see the Merchant Onboarding Guide below.
Merchant Onboarding Guide
This section provides a step-by-step walkthrough of the merchant registration and onboarding process with Apple Pay. Merchants using the unmanaged integration must complete these steps independently before processing live transactions.
The steps and interfaces described in this section are based on the Apple Developer Portal as of the time of writing. Apple may update their platform, click-flow, or requirements at any time. We recommend always referring to the official Apple Pay developer documentation and Apple Developer Portal for the most current information.
1. Enroll in the Apple Developer Program
An Apple Developer account is required to configure Apple Pay. Enroll at https://developer.apple.com/programs/.
- A paid Apple Developer Program membership is required. Apple Pay capabilities require an active Apple Developer Program membership.
- For business integrations, Apple strongly recommends enrolling as an Organization rather than as an Individual.
- The organization enrollment process requires a D-U-N-S number (Dun & Bradstreet). If your company does not have one, you can request it for free — but it may take several business days.
- Individual enrollments are also possible, but organization accounts offer better team management and are preferred for production merchant setups.
Apple Developer Program enrollment page.

If your organization already has an Apple Developer account (e.g. for iOS app development), you can reuse it for Apple Pay. No separate account is needed.
2. Create a Merchant Identifier
A merchant identifier uniquely identifies your business to Apple Pay. It is used across all Apple Pay configurations (certificates, domains, sessions). Create one in the Apple Developer Portal:
- Sign in to your Apple Developer account.
- Navigate to Certificates, Identifiers & Profiles → Identifiers.
- Click the "+" button to register a new identifier.
- Select Merchant IDs as the identifier type and click Continue.
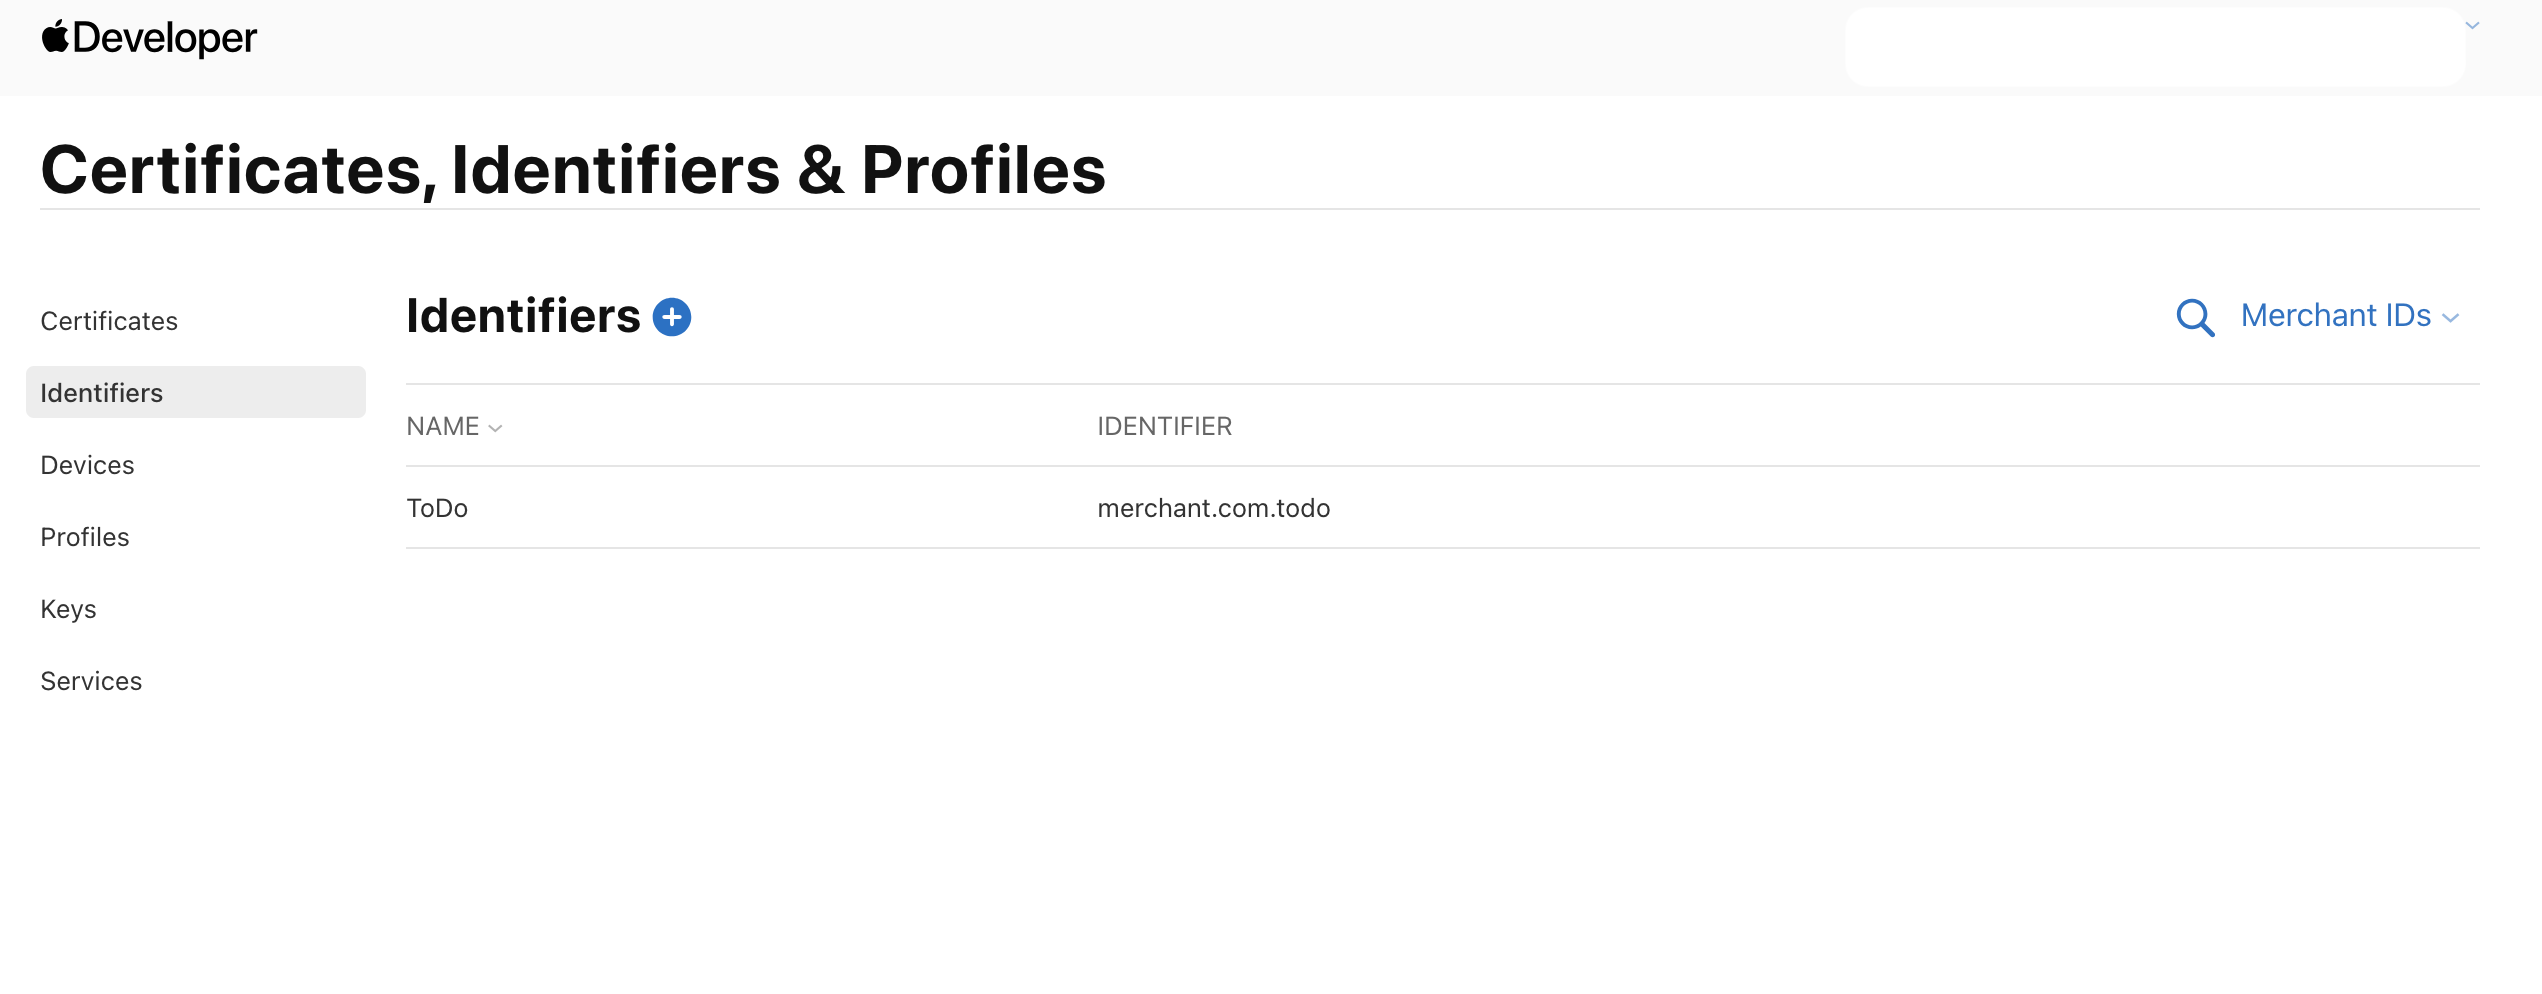
- Enter the following information:
- Description — A human-readable name for this merchant identifier (e.g. "My Shop").
- Identifier — A unique reverse-domain-style string (e.g.
merchant.com.yourdomain.pay). This cannot be changed later.
- Click Continue and then Register.
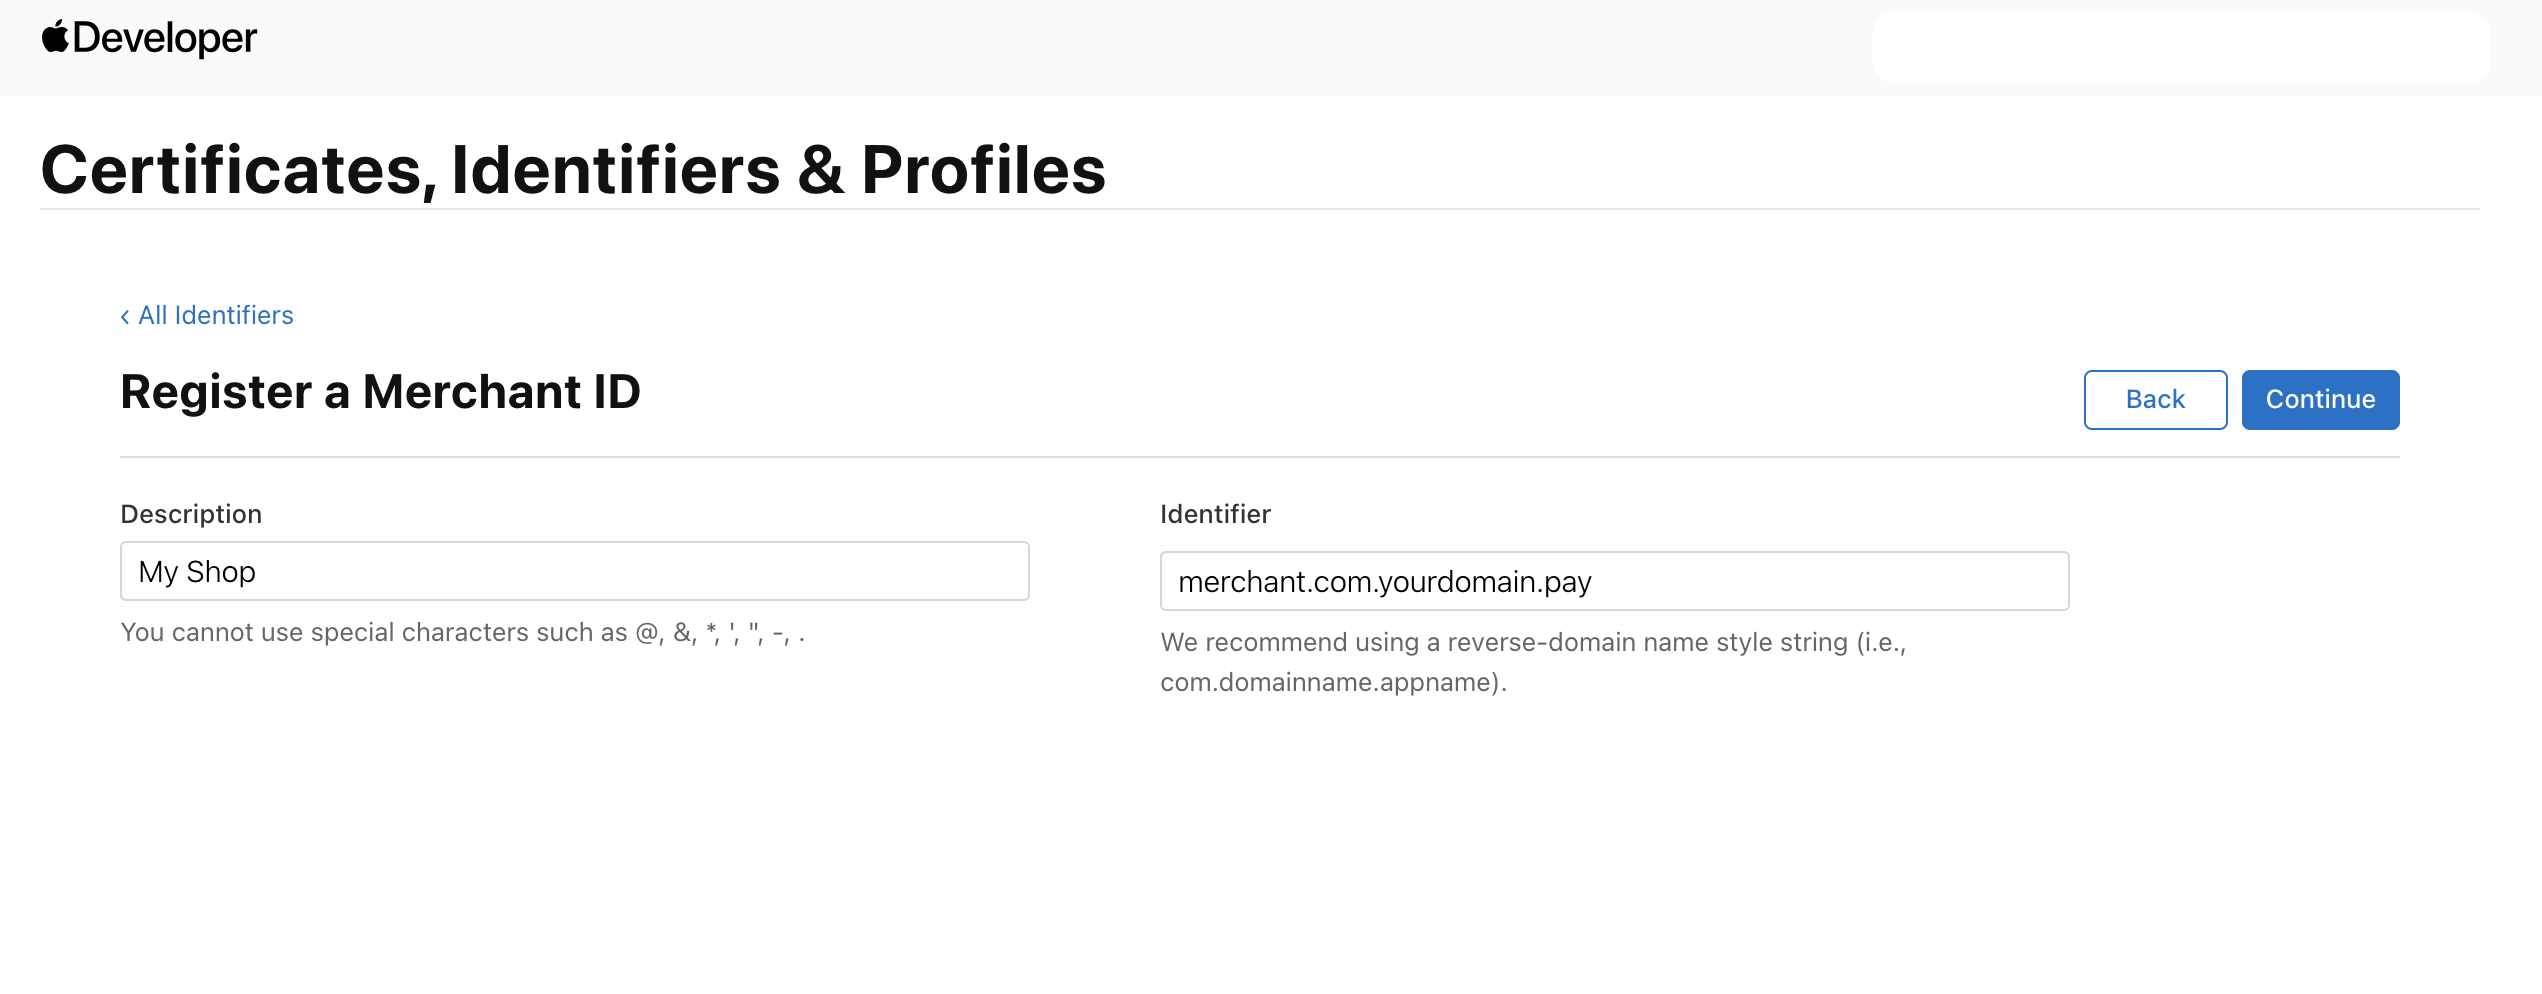
After registration, the merchant identifier appears in the list under Identifiers → Merchant IDs.
Choose a merchant identifier that clearly identifies your business and environment. You can create multiple merchant identifiers if needed (e.g. merchant.com.yourdomain.production and merchant.com.yourdomain.sandbox for different environments).
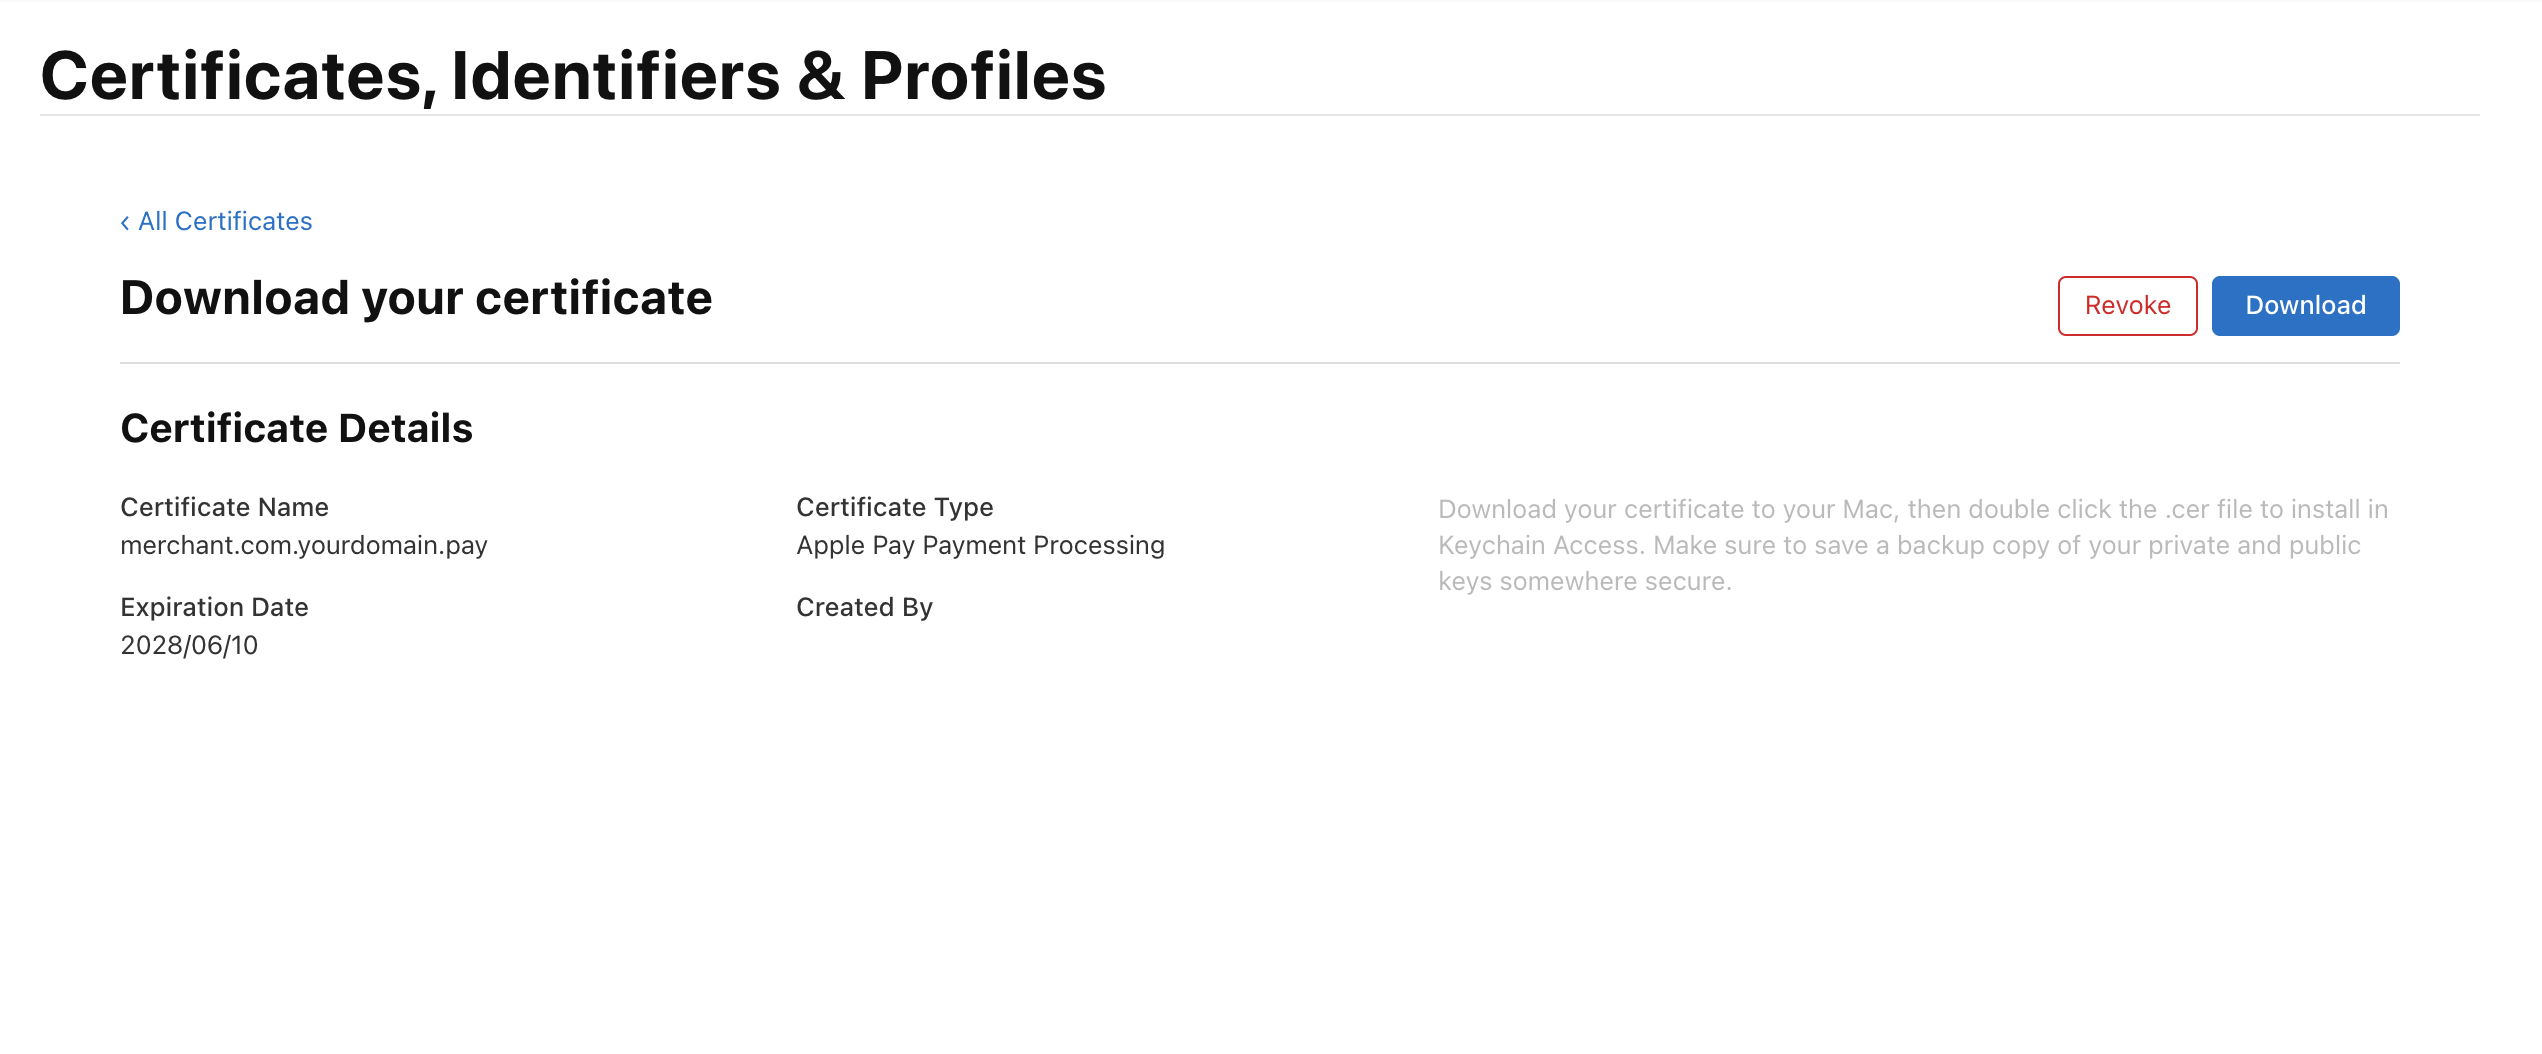
3. Create a Payment Processing Certificate
The Payment Processing Certificate is used by Apple to encrypt the payment data included in the Apple Pay token. Your server uses the corresponding private key to decrypt the token and extract the card data.
|
Generate a CSR (Certificate Signing Request)
A CSR must be generated to obtain the Payment Processing Certificate from Apple. Apple requires an ECC (Elliptic Curve) key for payment processing certificates. The corresponding private key must be securely stored on the server that will decrypt Apple Pay tokens.
Using OpenSSL (recommended for servers):
# Generate an ECC private key (prime256v1 curve)
openssl ecparam -out apple_pay_private.key -name prime256v1 -genkey

# Generate the CSR from the private key
openssl req -new -sha256 -key apple_pay_private.key -out apple_pay.csr \
  -subj "/CN=Your Company Name/O=Your Company Name/C=DE"
Using Keychain Access (macOS):
- Open Keychain Access → Certificate Assistant → Request a Certificate From a Certificate Authority.
- Enter your email address and common name.
- Select "Saved to disk" and choose ECC as the key pair algorithm if available.
- Save the
.certSigningRequestfile.
Keep the private key secure. The private key generated alongside the CSR is what allows you to decrypt Apple Pay payment tokens. If the private key is compromised, you must revoke the certificate and create a new one. Never share the private key.
Upload the CSR to the Apple Developer Portal
- In the Apple Developer Portal, navigate to Certificates, Identifiers & Profiles → Identifiers → Merchant IDs.
- Select the merchant identifier created in Step 2.
- Under Apple Pay Payment Processing Certificate, click Create Certificate.

- Apple will ask: "Will payments associated with this Merchant ID be processed exclusively in China mainland?" — Select No (unless your business processes exclusively in China mainland).
- Click Continue.
- Upload the CSR file (
.csror.certSigningRequest) generated in the previous step. - Click Continue. Apple will generate and issue the certificate.
- Download the certificate file (
.cer).
Install the certificate on your server
The downloaded .cer file must be installed on the server that decrypts Apple Pay tokens. Combine it with the private key for use in your decryption logic:
# Convert the .cer to PEM format
openssl x509 -inform DER -in apple_pay.cer -out apple_pay_cert.pem

# You now have:
# - apple_pay_cert.pem (public certificate)
# - apple_pay_private.key (private key from CSR generation)
# Both are needed to decrypt Apple Pay payment tokens.
The Payment Processing Certificate expires after 25 months. You must renew it before expiration to avoid service interruption. Apple sends expiry reminders to the account holder's email. When you renew, a new CSR and private key pair must be generated.
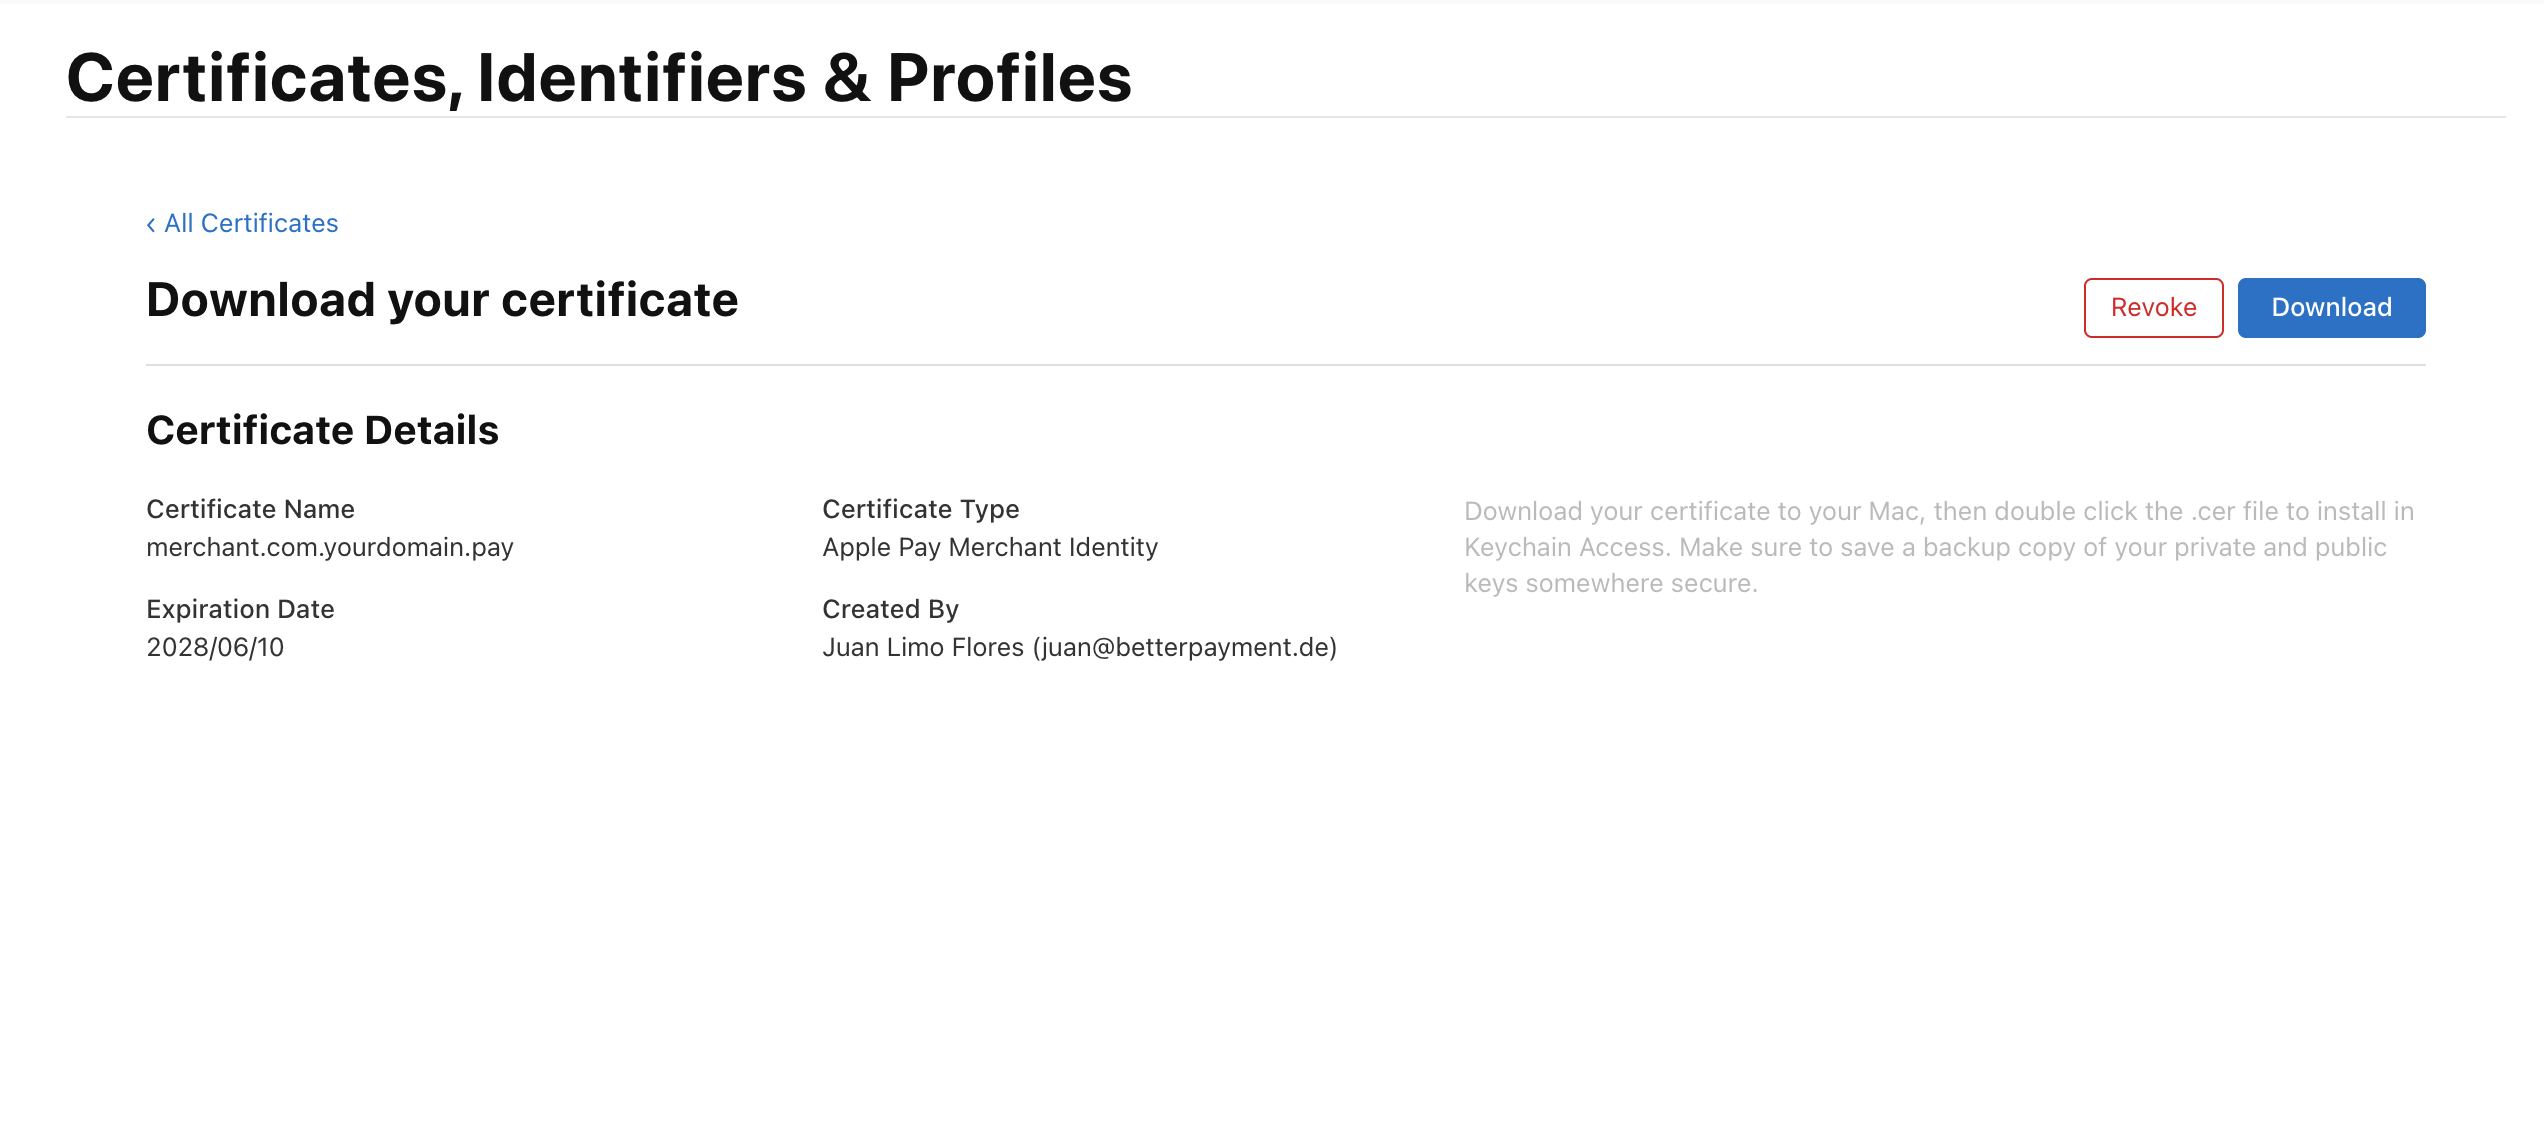
4. Create a Merchant Identity Certificate (Web only)
The Merchant Identity Certificate is used for TLS mutual authentication between your server and Apple's servers when creating an Apple Pay session on the web. This certificate is only required for web integrations (Apple Pay on the Web) — it is not needed for in-app (iOS/watchOS) integrations.
This certificate is used during the merchant validation step, where your server calls Apple's payment session endpoint to prove it is an authorized merchant. It is not used to decrypt payment tokens — that is handled by the Payment Processing Certificate.
Generate a CSR for the Merchant Identity Certificate
Unlike the Payment Processing Certificate, the Merchant Identity Certificate uses an RSA 2048-bit key:
# Generate an RSA private key
openssl genrsa -out apple_pay_merchant_identity.key 2048

# Generate the CSR
openssl req -new -sha256 -key apple_pay_merchant_identity.key -out apple_pay_merchant_identity.csr \
  -subj "/CN=Your Company Name/O=Your Company Name/C=DE"
Upload and download in the Apple Developer Portal
- In the Apple Developer Portal, select your merchant identifier.
- Under Apple Pay Merchant Identity Certificate, click Create Certificate.
- Upload the RSA CSR file.
- Download the generated certificate.
Use the certificate for merchant validation
Combine the certificate and private key to use in TLS client authentication when calling Apple's session endpoint:
# Convert to PEM
openssl x509 -inform DER -in merchant_id.cer -out apple_pay_merchant_identity_cert.pem

# Create a combined PEM file (used by many HTTP clients for mutual TLS)
cat apple_pay_merchant_identity_cert.pem apple_pay_merchant_identity.key > apple_pay_merchant_identity_combined.pem
Your server uses this combined certificate when making the POST request to Apple's /paymentSession endpoint during merchant validation.
The Merchant Identity Certificate expires after 25 months. Renew it before expiration to avoid disruptions in merchant validation on the web.
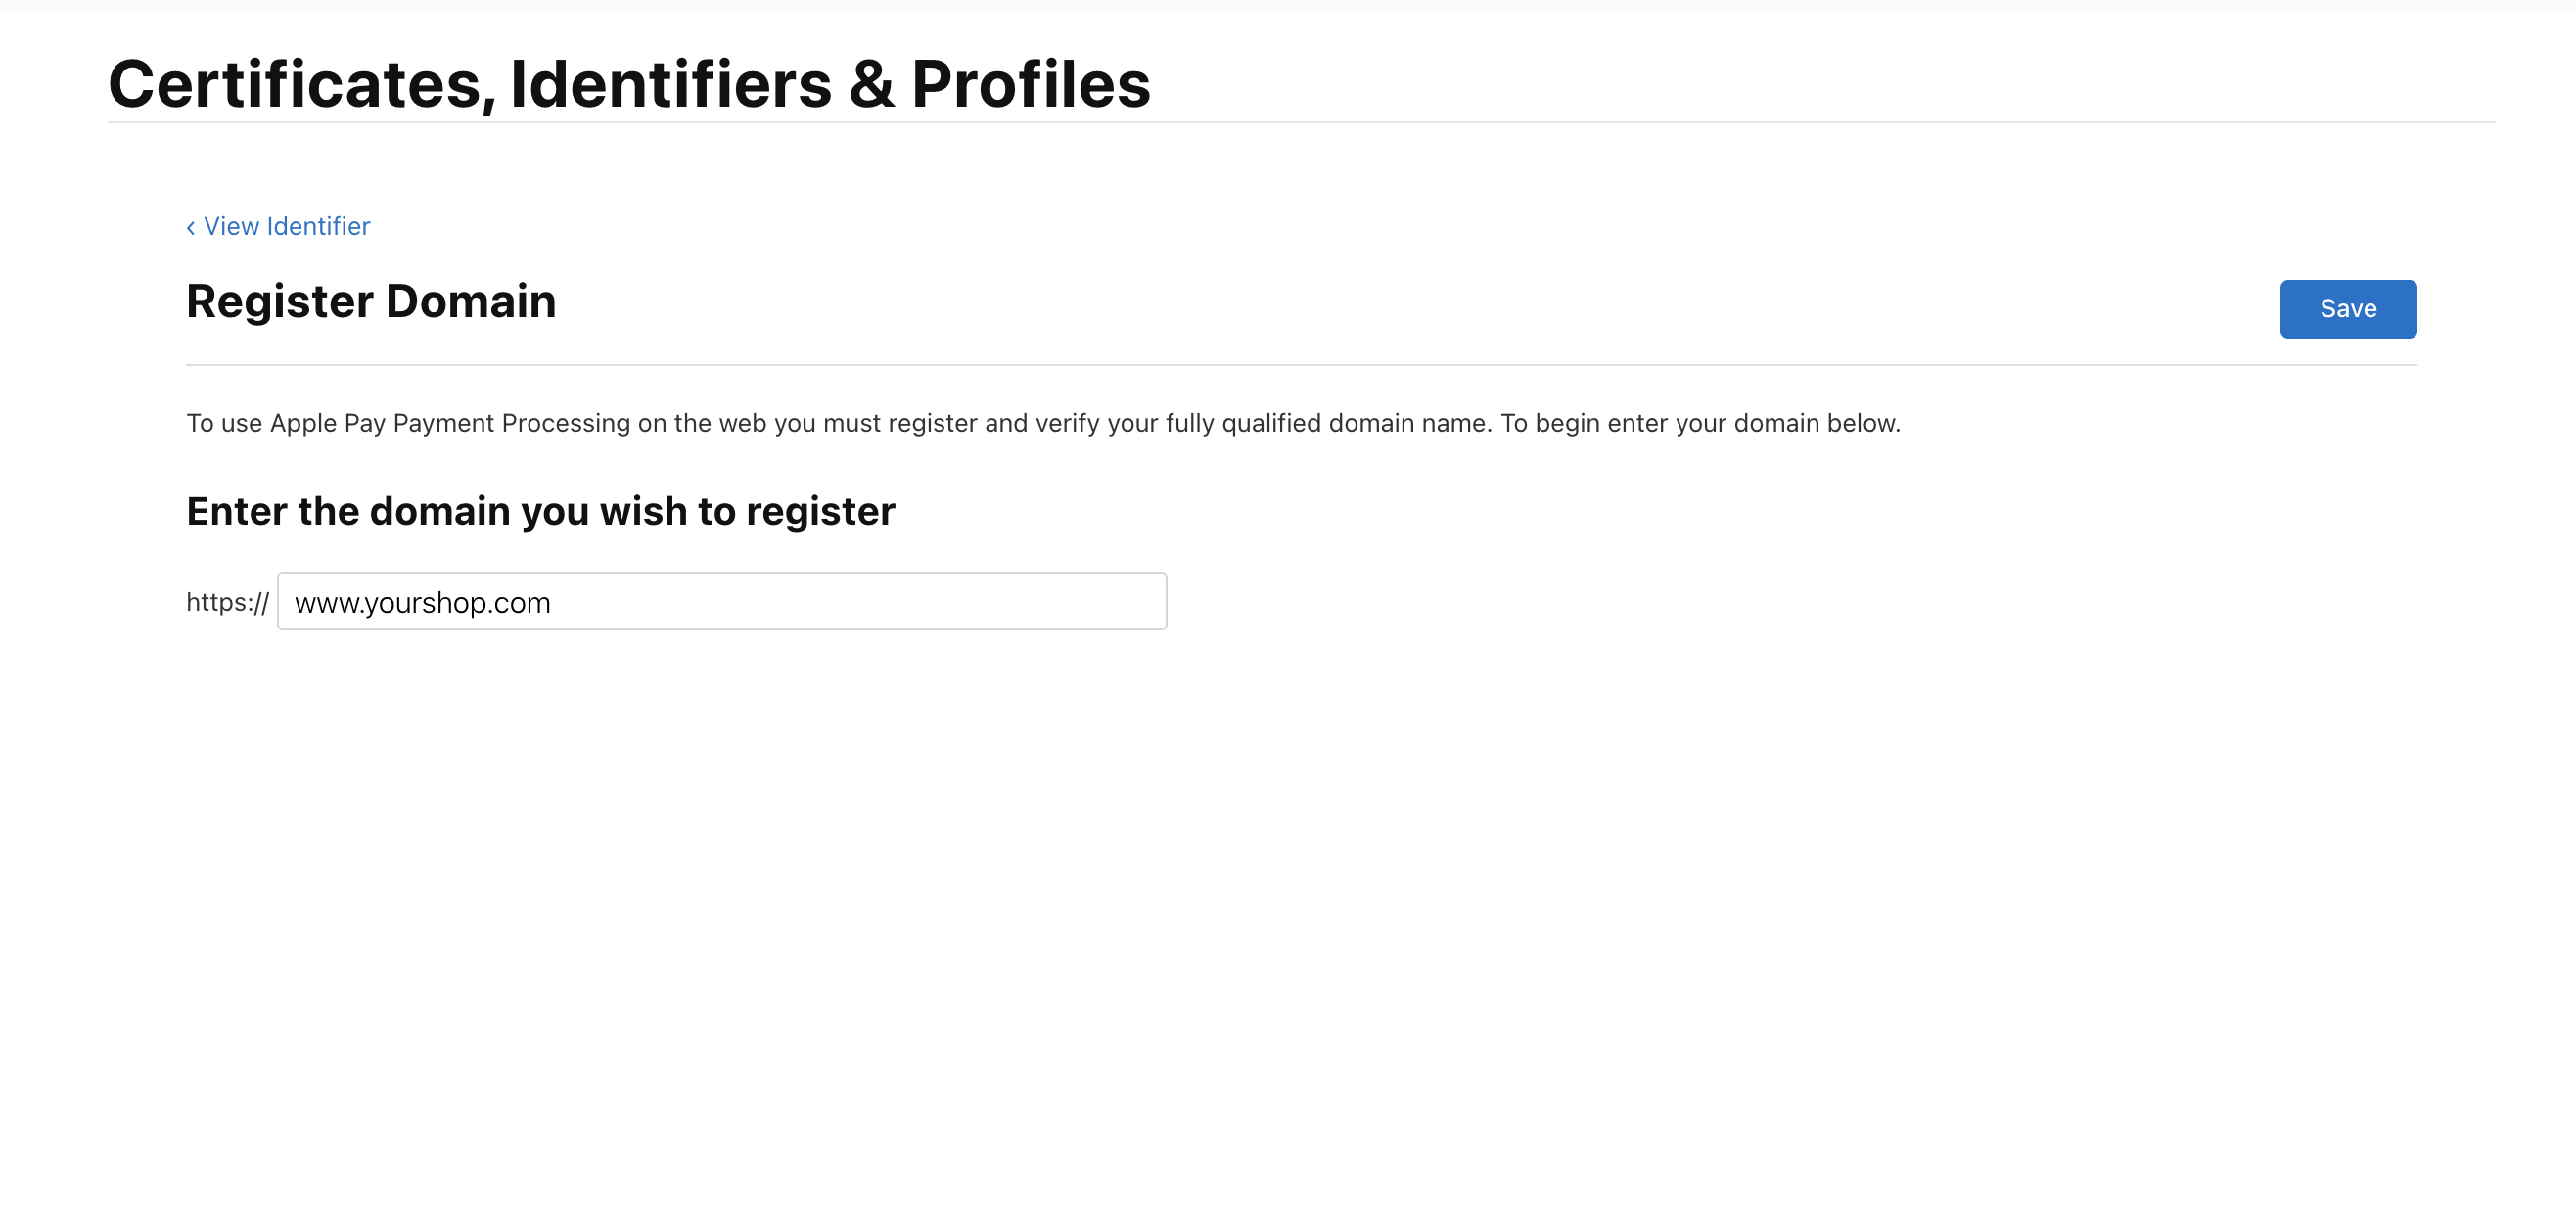
5. Register and Verify Your Domain
Apple requires that all domains displaying the Apple Pay button are registered and verified. This step proves you control the domain where Apple Pay is offered.
- In the Apple Developer Portal, navigate to Certificates, Identifiers & Profiles → Identifiers → Merchant IDs.
- Select your merchant identifier.
- Under Merchant Domains, click Add Domain.
- Enter your fully qualified domain name (e.g.
www.yourshop.com). HTTPS is required.
- Apple provides a domain verification file (
apple-developer-merchantid-domain-association). Download it.
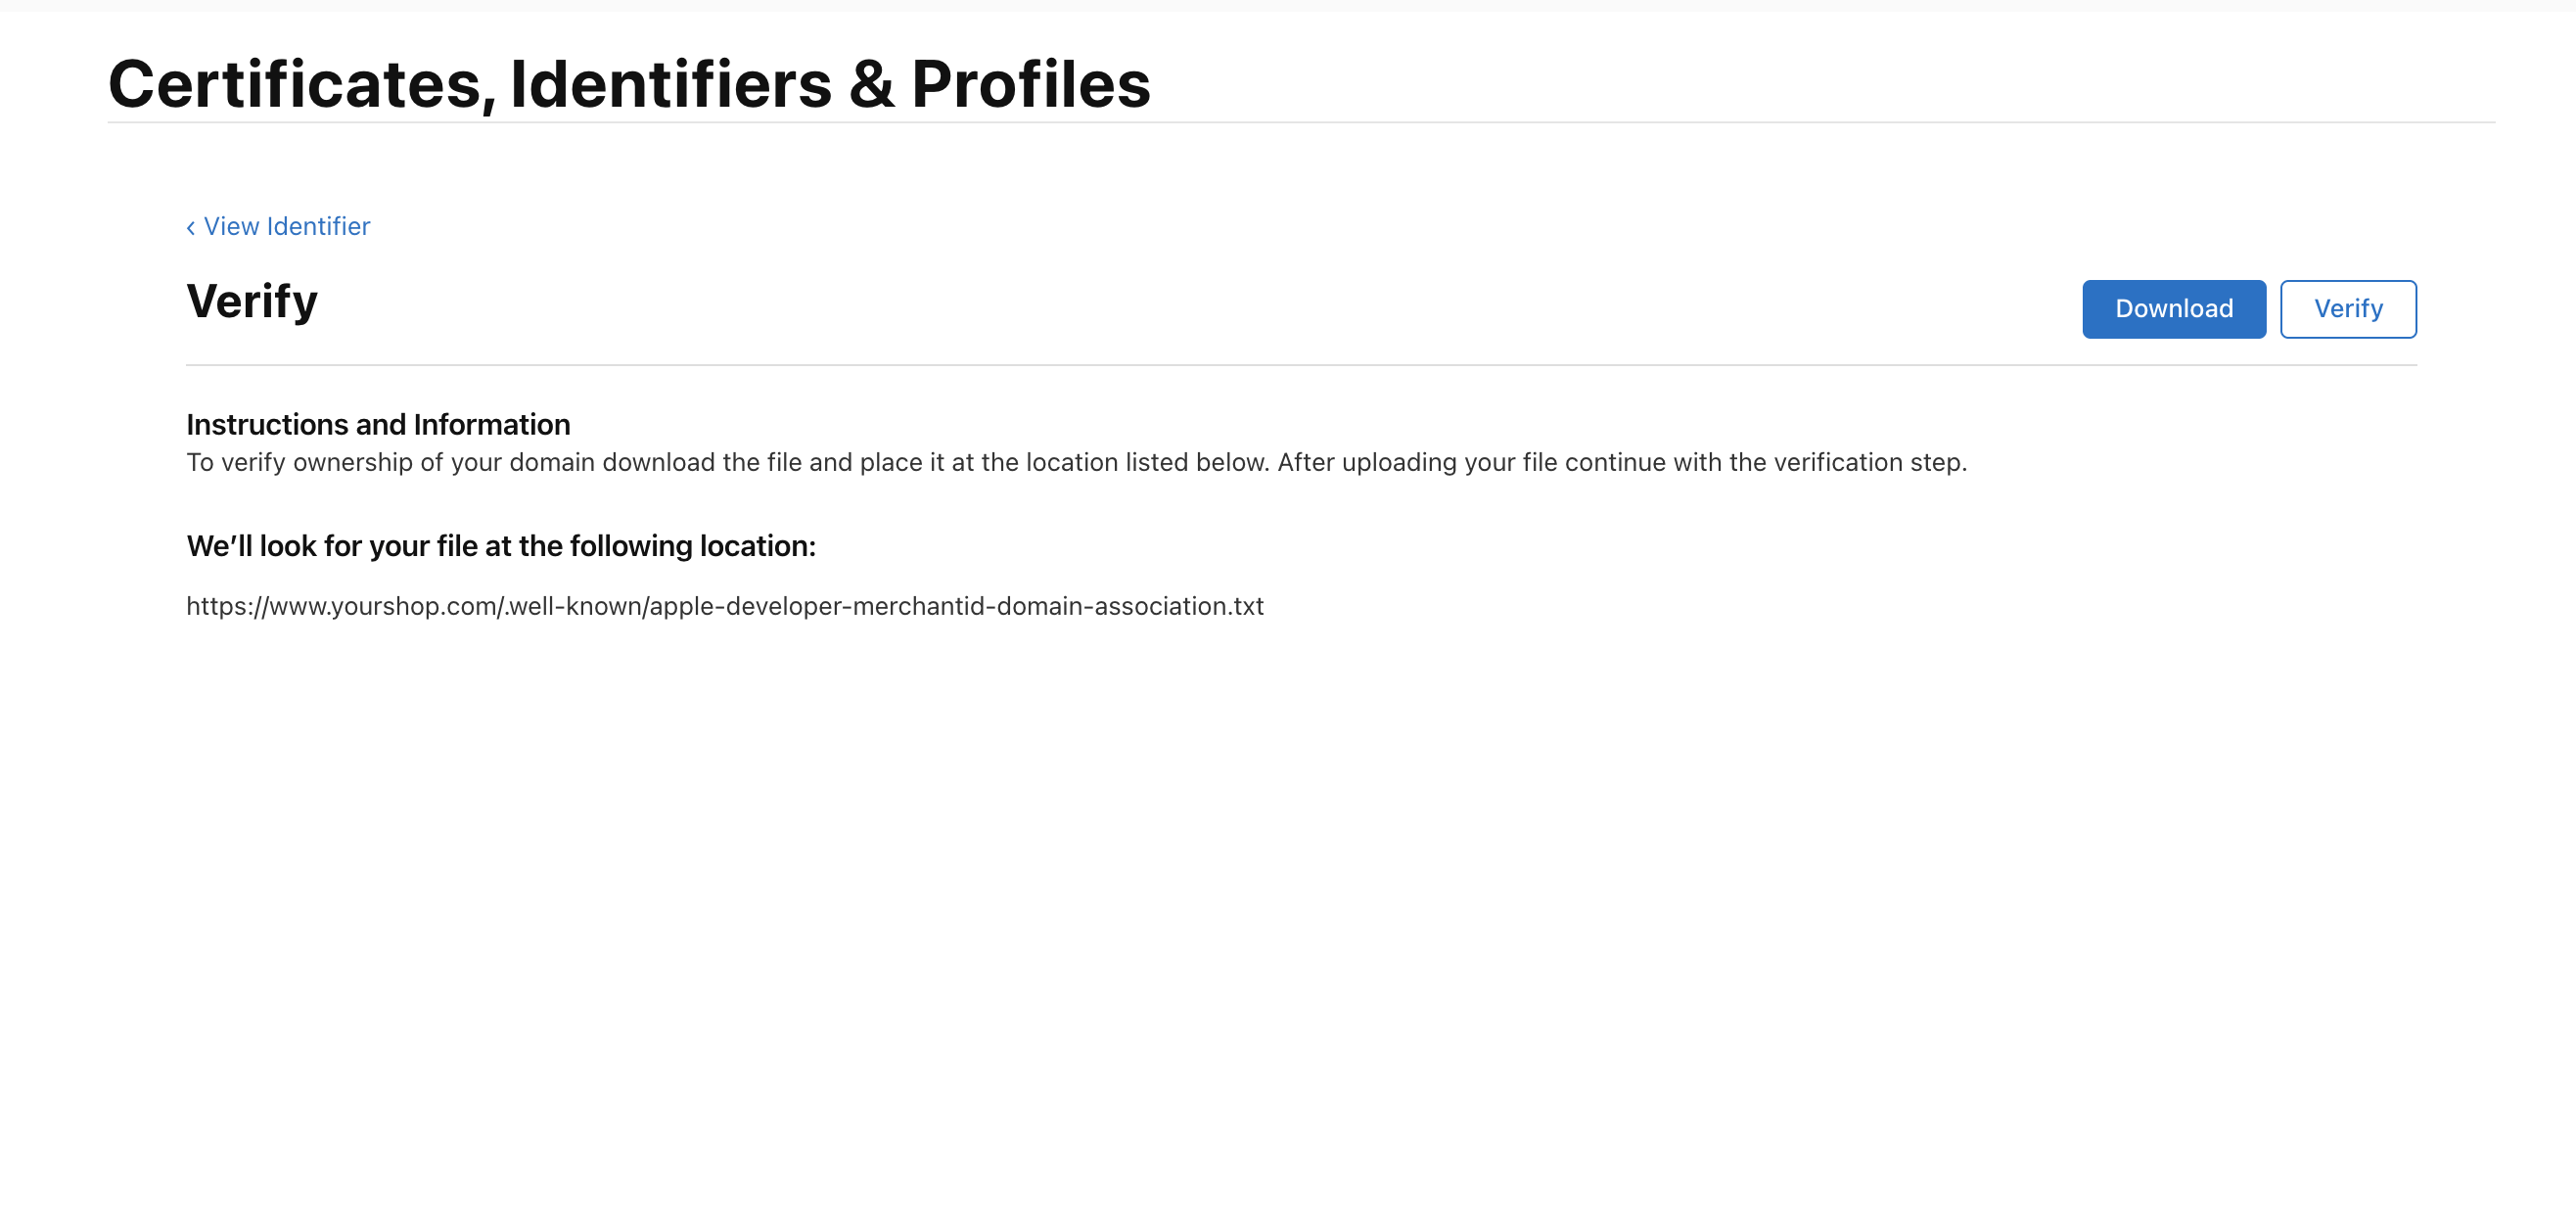
- Host the file on your web server at the following exact path:
https://yourdomain.com/.well-known/apple-developer-merchantid-domain-association
- Return to the Apple Developer Portal and click Verify.
Each domain where the Apple Pay button is displayed must be individually registered and verified. This includes:
- Your production domain(s)
- Staging or test domains (if you want to test Apple Pay there)
- Subdomains count as separate domains (e.g.
shop.yourdomain.comandwww.yourdomain.comrequire separate verification)
The verification file must be served with the correct MIME type (application/octet-stream or text/plain) and must be accessible without redirects. If verification fails, check that the file is reachable at the exact URL and that no WAF/CDN is blocking Apple's verification request.
6. Complete Onboarding with Our Platform
Once your Apple Developer account, certificates, and domain verification are set up, contact us to complete the onboarding process:
No Apple Pay-specific information is required from your side for onboarding. Your Apple Pay merchant identifier and certificates are used only between your server and Apple — our platform does not interact with Apple Pay directly in the unmanaged integration.
What we provide to you
| Item | Description |
|---|---|
| API credentials | Your api_key and api_password for OneAPI (if not already configured) |
| Confirmation | Confirmation that your merchant account is configured and ready for Apple Pay processing |
7. Integrate the Apple Pay API on Your Frontend
Once the above steps are complete, integrate the Apple Pay API on your website or app. Below is an overview of the key tasks; for full implementation details, refer to Apple's official documentation.
Web Integration
Follow Apple's Apple Pay on the Web documentation. Key steps:
- Check Apple Pay availability — Use
ApplePaySession.canMakePayments()to verify the customer's device supports Apple Pay.
if (window.ApplePaySession && ApplePaySession.canMakePayments()) {
  // Show Apple Pay button
}
- Render the Apple Pay button — Use Apple's official button styles per the Human Interface Guidelines.
<apple-pay-button buttonstyle="black" type="buy" locale="en"></apple-pay-button>
- Create an Apple Pay session — When the customer clicks the button, create an
ApplePaySessionwith your payment request:
const paymentRequest = {
  countryCode: "DE",
  currencyCode: "EUR",
  merchantCapabilities: ["supports3DS"],
  supportedNetworks: ["visa", "masterCard"],
  total: {
    label: "Your Shop Name",
    amount: "25.90"
  }
};

const session = new ApplePaySession(3, paymentRequest);
- Handle merchant validation — Apple calls
onvalidatemerchant. Your server must call Apple's/paymentSessionendpoint using the Merchant Identity Certificate (from Step 4):
session.onvalidatemerchant = (event) => {
  // Call your server to request a payment session from Apple
  fetch("/your-server/apple-pay/validate", {
    method: "POST",
    body: JSON.stringify({ validationURL: event.validationURL })
  })
  .then(res => res.json())
  .then(merchantSession => {
    session.completeMerchantValidation(merchantSession);
  });
};
Your server-side validation request to Apple:
curl -X POST <validationURL> \
  --cert apple_pay_merchant_identity_combined.pem \
  -d '{
    "merchantIdentifier": "merchant.com.yourdomain.pay",
    "displayName": "Your Shop Name",
    "initiative": "web",
    "initiativeContext": "www.yourshop.com"
  }'
- Handle the payment token — After the customer authenticates, Apple returns the encrypted payment token via
onpaymentauthorized:
session.onpaymentauthorized = (event) => {
  const token = event.payment.token;
  // Send token to your server for decryption
  // Then send decrypted card data to OneAPI
};
- Decrypt the token on your server — Use the Payment Processing Certificate private key (from Step 3) to decrypt the
PKPaymentToken. Extract the card data (DPAN, expiry, cryptogram) and send it to OneAPI.
iOS / App Integration
Follow Apple's PassKit (Apple Pay and Wallet) documentation. Key differences from web:
- No Merchant Identity Certificate is needed (no web-based merchant validation).
- Use
PKPaymentAuthorizationViewControllerorPKPaymentAuthorizationController. - Merchant validation is handled automatically by the PassKit framework.
- The
PKPaymentTokenis returned in thedidAuthorizePaymentdelegate method.
The exact steps and interfaces may change as Apple updates their platform. The steps above reflect the process as of the time of writing. Refer to the official Apple Pay documentation for the most current information.
Once your domain is verified, certificates are configured, and your frontend integration is complete, you can process live Apple Pay transactions.
How it works
- Customer initiates a transaction on the merchant's website or app.
- Merchant displays the Apple Pay button on their frontend.
- Customer clicks the Apple Pay button and authenticates via Face ID, Touch ID, or passcode.
- Apple returns an encrypted payment token to the merchant.
- Merchant decrypts the token and extracts the card data.
- Merchant sends the card data to OneAPI via the Payment API (Server-to-Server).
- OneAPI returns the transaction result.
- OneAPI sends a webhook notification to the merchant's
postback_url. - Merchant updates order status and displays final confirmation to the customer.
Payment Flow (Unmanaged)
Server-to-Server Direct Processing
The merchant sends the decrypted card data to OneAPI via the Payment API. The processing flow depends on whether a wallet cryptogram is available in the decrypted Apple Pay token.
Whether a cryptogram is present in the Apple Pay token depends on Apple Pay, the card network, and the issuing bank — not on OneAPI. This determines whether 3DS authentication is required for the transaction.
With wallet cryptogram (no 3DS required)
When the decrypted Apple Pay token contains a cryptogram, pass it along with the card data. The cryptogram serves as proof of cardholder authentication, so no additional 3DS authentication is needed.
payment_typeStringrequiredapplepayorder_idStringrequiredamountFloatrequiredcurrencyStringrequiredpostback_urlStringrequiredsuccess_urlStringrequirederror_urlStringrequiredcard_numberStringrequiredcard_holderStringrequiredcard_expiry_monthStringrequiredcard_expiry_yearStringrequiredthreeds_wallet_cryptogramStringrequiredthreeds_wallet_cryptogram_eciStringPOST /rest/payment
Authorization: Basic <base64(api_key:api_password)>
Content-Type: application/json
{
"payment_type": "applepay",
"order_id": "APAY-67890",
"amount": "25.90",
"currency": "EUR",
"postback_url": "https://your-postback.url.com",
"success_url": "https://your-success.url.com",
"error_url": "https://your-error.url.com",
"card_number": "4761070000000509",
"card_holder": "John Doe",
"card_expiry_month": "12",
"card_expiry_year": "2026",
"threeds_wallet_cryptogram": "AgAAAAAABk4DWZ4C28yUQAAAAAA=",
"threeds_wallet_cryptogram_eci": "07"
}
Payment API Response
transaction_idStringpayment_typeStringstatus_codeIntegerstatusStringorder_idStringmessageStringincluded_feesStringerror_codeInteger{
"transaction_id": "a2c4e6f8-1234-5678-abcd-ef0123456789",
"payment_type": "applepay",
"status_code": 3,
"status": "completed",
"order_id": "APAY-67890",
"message": null,
"included_fees": "0.00",
"error_code": 0
}
Without wallet cryptogram (3DS may be required)
When the cryptogram is not available in the decrypted token, 3DS authentication may be required. If the merchant has their own MPI (Merchant Plug-In) for 3DS, they can pass the 3DS authentication results directly and the gateway will skip its own 3DS verification. Otherwise, the gateway will perform 3DS authentication automatically.
payment_typeStringrequiredapplepayorder_idStringrequiredamountFloatrequiredcurrencyStringrequiredpostback_urlStringrequiredsuccess_urlStringrequirederror_urlStringrequiredcard_numberStringrequiredcard_holderStringrequiredcard_expiry_monthStringrequiredcard_expiry_yearStringrequiredthreeds_authentication_valueStringthreeds_directory_server_trans_id, the gateway will skip its own 3DS verification.threeds_directory_server_trans_idStringthreeds_authentication_value.threeds_authentication_value and threeds_directory_server_trans_id are provided, the gateway will skip its own 3DS verification. Otherwise, the gateway will perform 3DS authentication automatically. The optional processing parameters from Cardholder Data Parameters such as card_entry, charge_order, clearing_mode, clear_after, and sca_exemption_request are also accepted in this flow.POST /rest/payment
Authorization: Basic <base64(api_key:api_password)>
Content-Type: application/json
{
"payment_type": "applepay",
"order_id": "APAY-99999",
"amount": "25.90",
"currency": "EUR",
"postback_url": "https://your-postback.url.com",
"success_url": "https://your-success.url.com",
"error_url": "https://your-error.url.com",
"card_number": "4761070000000509",
"card_holder": "John Doe",
"card_expiry_month": "12",
"card_expiry_year": "2026",
"threeds_authentication_value": "MDAxMDAxMDAxMDAxMDAxMDAxMDA=",
"threeds_directory_server_trans_id": "f25084f0-5b16-4c0a-ae5d-b24e2f921514"
}
Payment API Response
With MPI (direct)
When threeds_authentication_value and threeds_directory_server_trans_id are provided, the gateway skips its own 3DS verification and the response is direct:
transaction_idStringpayment_typeStringstatus_codeIntegerstatusStringorder_idStringmessageStringadditional_transaction_dataStringpostback_url as part of the postback data.amountFloatincluded_feesStringerror_codeInteger{
"transaction_id": "d1bf9fdf-7268-406f-9e08-8d5a9540ab97",
"payment_type": "applepay",
"status_code": 3,
"status": "completed",
"order_id": "APAY-99999",
"message": null,
"additional_transaction_data": "",
"amount": 25.90,
"included_fees": "0.00",
"error_code": 0
}
Without MPI (3DS required)
When the 3DS parameters are not provided, the gateway triggers its own 3DS flow. The response will have status: "pending" and a client_action that the merchant must handle:
transaction_idStringpayment_typeStringstatus_codeIntegerstatusStringorder_idStringmessageStringadditional_transaction_dataStringpostback_url as part of the postback data.amountFloatincluded_feesStringerror_codeIntegerclient_actionStringaction_data) or redirect (redirect to the url in action_data).action_dataObjecturl (target URL of the action) and, in case of a postForm, fields (key/value pairs of the data to be posted).fields to the provided url in action_data. This will redirect the customer to the 3DS authentication page. Once 3DS is completed, the customer is returned to the merchant's success_url or error_url.{
"transaction_id": "d1bf9fdf-7268-406f-9e08-8d5a9540ab97",
"payment_type": "applepay",
"status_code": 2,
"status": "pending",
"order_id": "APAY-99999",
"message": null,
"additional_transaction_data": null,
"amount": 25.90,
"included_fees": "0.00",
"error_code": 0,
"client_action": "postForm",
"action_data": {
"url": "https://3ds-acs-url.example.com/v1/acs/challenge-initiate",
"fields": {
"creq": "eyJ0aHJlZURTU2VydmVyVHJ..."
}
}
}
Postbacks
For the full list of payment postback fields, see the Payment API. For retry policy and signature verification, see Postbacks.
Test Data
To learn how to add test cards for testing Apple Pay, please review the official Apple Pay sandbox testing documentation.
Unmanaged Integration Test Data
For testing unmanaged (Server-to-Server) Apple Pay transactions, use the following test data.
The card data in unmanaged Apple Pay transactions is actually token data (DPAN), not the real card number — but it follows the same format. CVV is not required for wallet token transactions.
3DS is very rare for Apple Pay transactions since the wallet cryptogram typically provides sufficient authentication.
Scenario 1 — With Cryptogram (instant completion)
The transaction will go straight to completed status.
| Parameter | Test Value |
|---|---|
threeds_wallet_cryptogram | Af9x2zAAAAABBBCC1XYCMAABAAA= |
threeds_wallet_cryptogram_eci | 05 |
card_number | 5286940020000908 |
card_holder | Max Mustermann |
card_expiry_month | 12 |
card_expiry_year | 2026 |
Scenario 2 — Without Cryptogram (3DS required)
Omit threeds_wallet_cryptogram. This triggers a 3DS flow. To complete the transaction, either:
- Option A — Pass merchant-side 3DS data:
| Parameter | Test Value |
|---|---|
threeds_authentication_value | AUTHENTICATION_VALUE |
threeds_directory_server_trans_id | 54c64c00-eef8-4a8b-af44-fee8cc57e530 |
- Option B — Complete the
client_actionreturned in the response (postFormorredirect) to continue with the acquirer-provided 3DS flow.