Google Pay™
Description
Google Pay allows customers to pay using cards stored in their Google account. It provides a fast and secure checkout experience on web and mobile. With the standard integration, the merchant handles the Google Pay setup on their own frontend — including Google Pay API configuration, tokenization, and button rendering — and sends the decrypted card data to OneAPI for payment processing.
Availability
Google Pay is available in over 70 countries worldwide. Supported card networks: Visa and Mastercard.
Transaction Types
The following transaction types are currently available:
Integration
With our Managed Google Pay integration, we handle everything for you — Google Pay configuration, gateway identifiers, tokenization settings, and frontend button rendering — all through the hosted payment page. No Google Pay API integration required on your side. See Managed Google Pay Integration in Optional Services.
The merchant handles all Google Pay configuration independently and sends the decrypted card data to OneAPI for payment processing.
Merchant Responsibilities
The following are managed entirely by the merchant and are out of scope of OneAPI:
- Google Pay Business account registration and configuration
- Google Pay API frontend integration (rendering the Google Pay button, handling the payment sheet)
- Receiving and decrypting the Google Pay payment token
- Completing the Google Pay integration checklist for production
For details on these steps, refer to the official Google Pay developer documentation.
What OneAPI Handles
Once the merchant has decrypted the Google Pay token and extracted the card data, OneAPI is responsible for:
- Processing the payment request with the decrypted card data
- Handling 3DS authentication when required (PAN_ONLY authorization method)
- Returning the transaction result
- Sending postback notifications with the final payment status
Prerequisites
Before integrating Google Pay in Unmanaged mode, the merchant must complete the following steps:
- Sign up with Google — Create a Google Pay account and agree to Google Pay's Terms of Service.
- Configure the Google Pay Business Console — In the Google Pay Business Console, provide the required configuration for your payment gateway and register the domains from which you intend to call the Google Pay API. This is where you obtain your Google Pay
merchantId. - Complete onboarding with our platform — Contact us to complete the onboarding process. You will receive your
gatewayMerchantId, which is the merchant-specific identifier issued by our platform for Google Pay processing. - Fulfill the Google Pay integration checklist — Before going to production, complete the relevant integration checklist:
- For web: Google Pay Web integration checklist
- For Android: Google Pay Android integration checklist
For detailed step-by-step instructions on completing the prerequisites above, see the Merchant Onboarding Guide below.
The gateway value in the tokenizationSpecification is a fixed identifier assigned to our platform by Google Pay — it is not something the merchant needs to obtain or configure. It will be provided to you during onboarding.
These values are used in the tokenizationSpecification when configuring Google Pay on your frontend:
{
  "type": "PAYMENT_GATEWAY",
  "parameters": {
    "gateway": "provided_by_platform",
    "gatewayMerchantId": "your_gateway_merchant_id"
  }
}
Merchant Onboarding Guide
This section provides a step-by-step walkthrough of the merchant registration and onboarding process with Google Pay. Merchants using the unmanaged integration must complete these steps independently before processing live transactions.
The steps and interfaces described in this section are based on the Google Pay & Wallet Console as of the time of writing. Google may update their platform, click-flow, or requirements at any time. We recommend always referring to the official Google Pay developer documentation and Google Pay Business Console for the most current information.
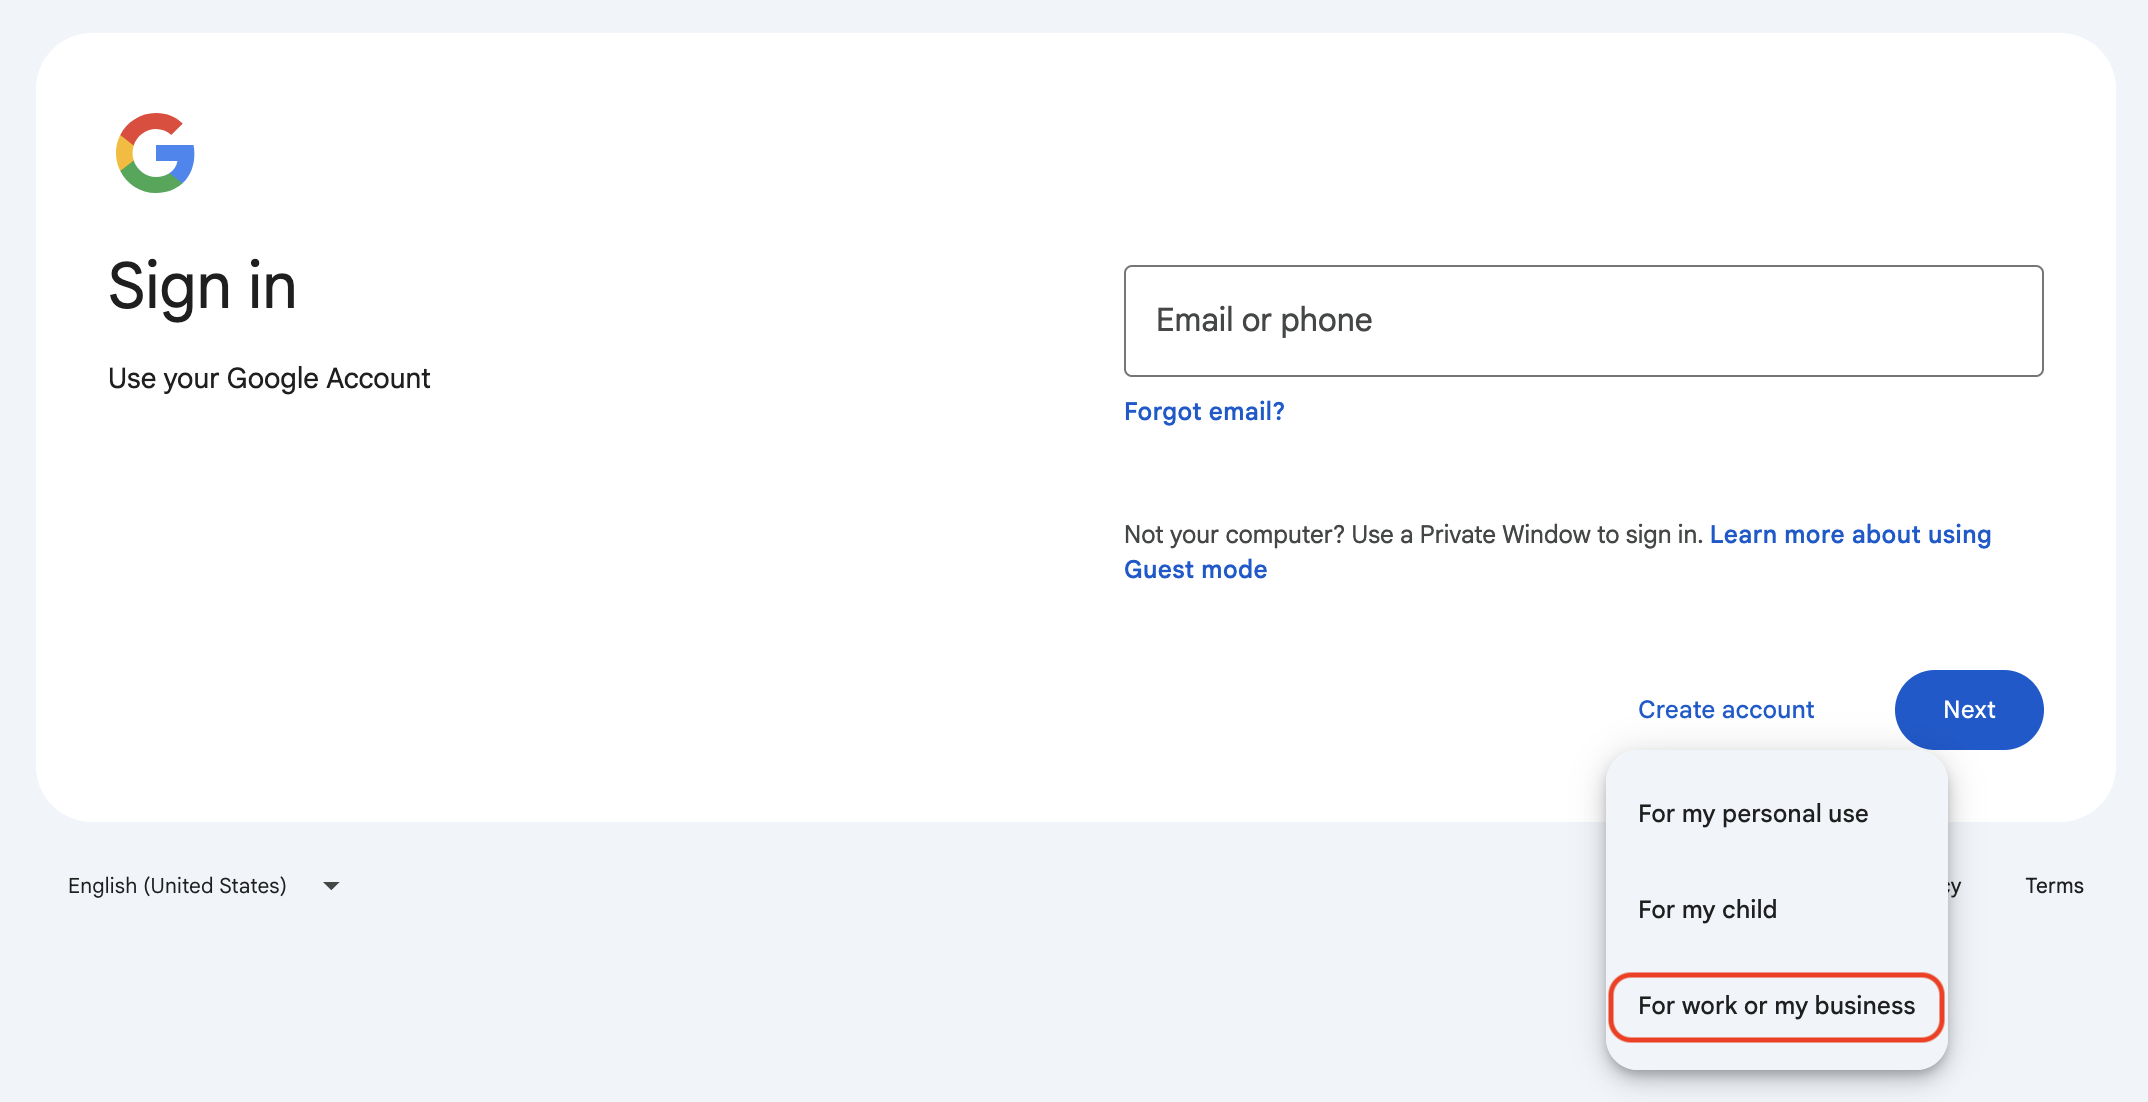
1. Create a Google Account
A Google Account is required to access the Google Pay & Wallet Console. Create one at https://accounts.google.com/.
- It is possible to use an existing personal Google account, but it is recommended to create a separate account for your business.
- When creating the account, select "For work or my business" to set up a business account.
- You can choose to use an existing email address or create a new Gmail address.
Sign in with Google Account — Create a business account.
2. Register a Business in the Google Pay & Wallet Console
A business must be created in the Google Pay & Wallet Console.
- Sign in with the Google account created in Step 1.
- Fill in the required business information:
- Public business name — The name displayed to customers.
- Type of business — Select "Merchant".
- Business location — The country where the business is registered. This cannot be changed later.
- Accept Google Pay and Wallet Console's Additional Terms of Service.
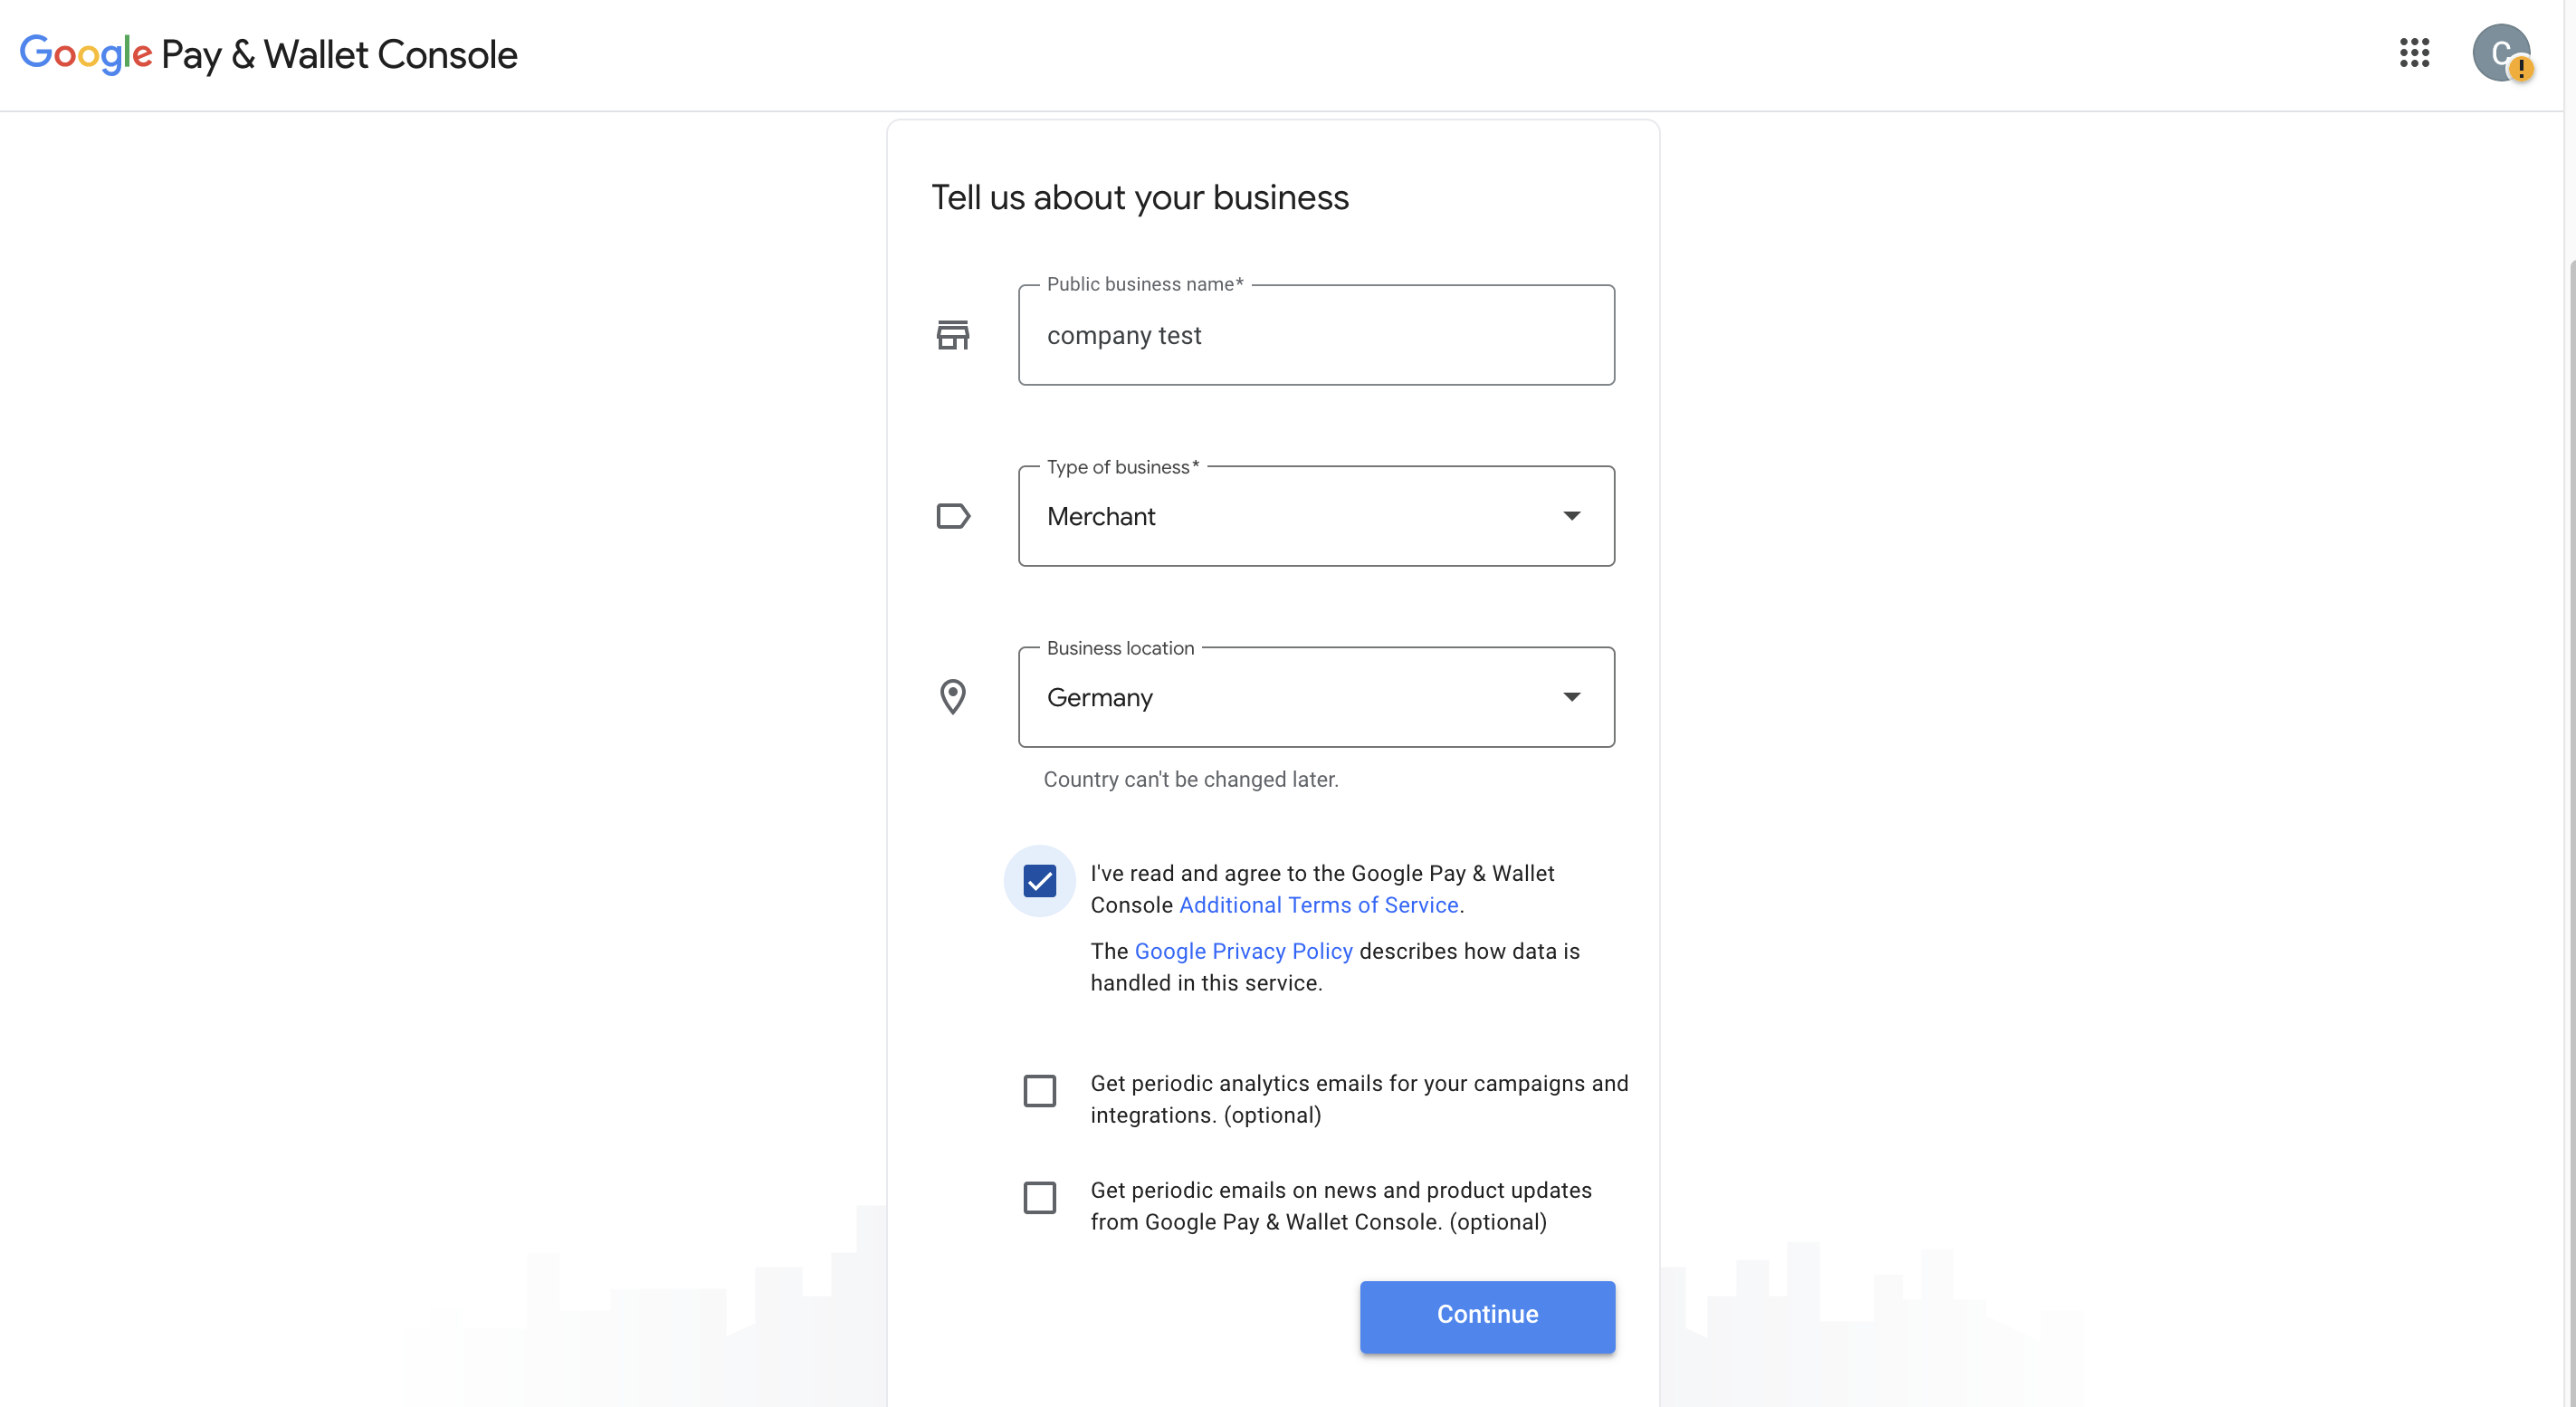
- After registration, the business Dashboard is displayed.
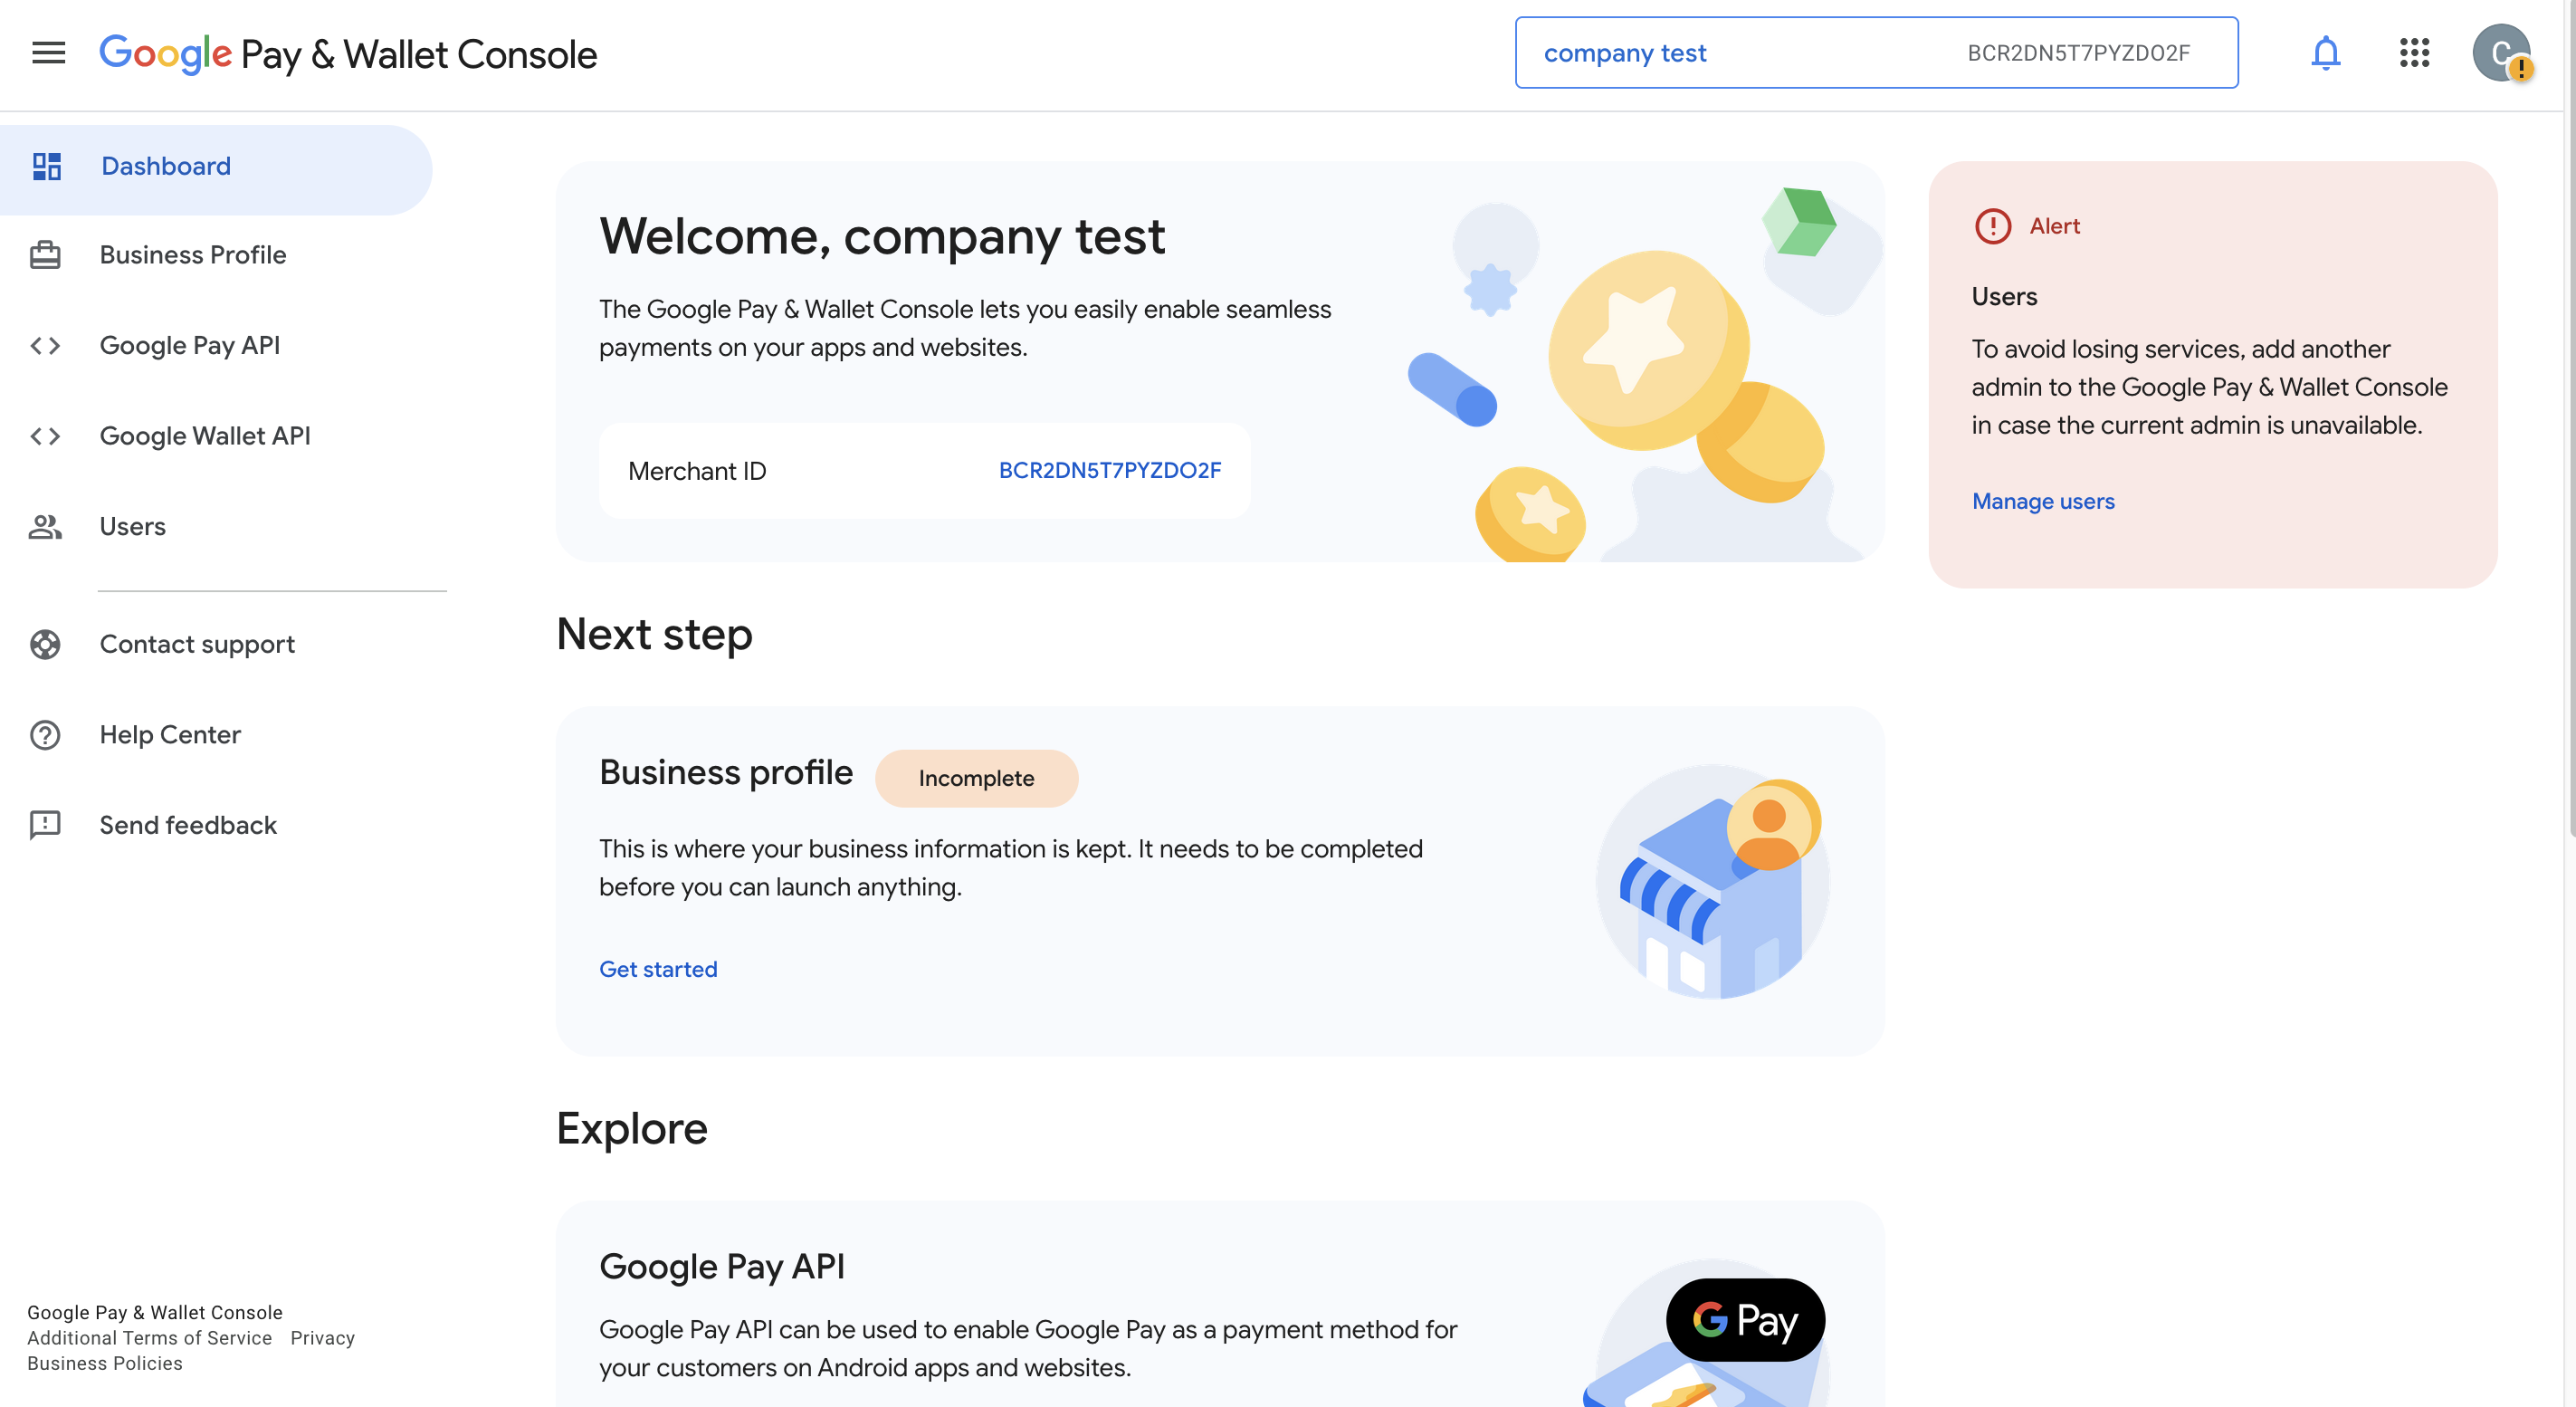
Make sure you are signed in with the correct Google account when accessing the Console. You can verify and switch accounts in the top-left corner.
The Dashboard shows the following configuration areas:
- Business Profile — Business identity and information (must be completed before going live).
- Google Pay API — API integration settings (domains, integration type, buyflow screenshots).
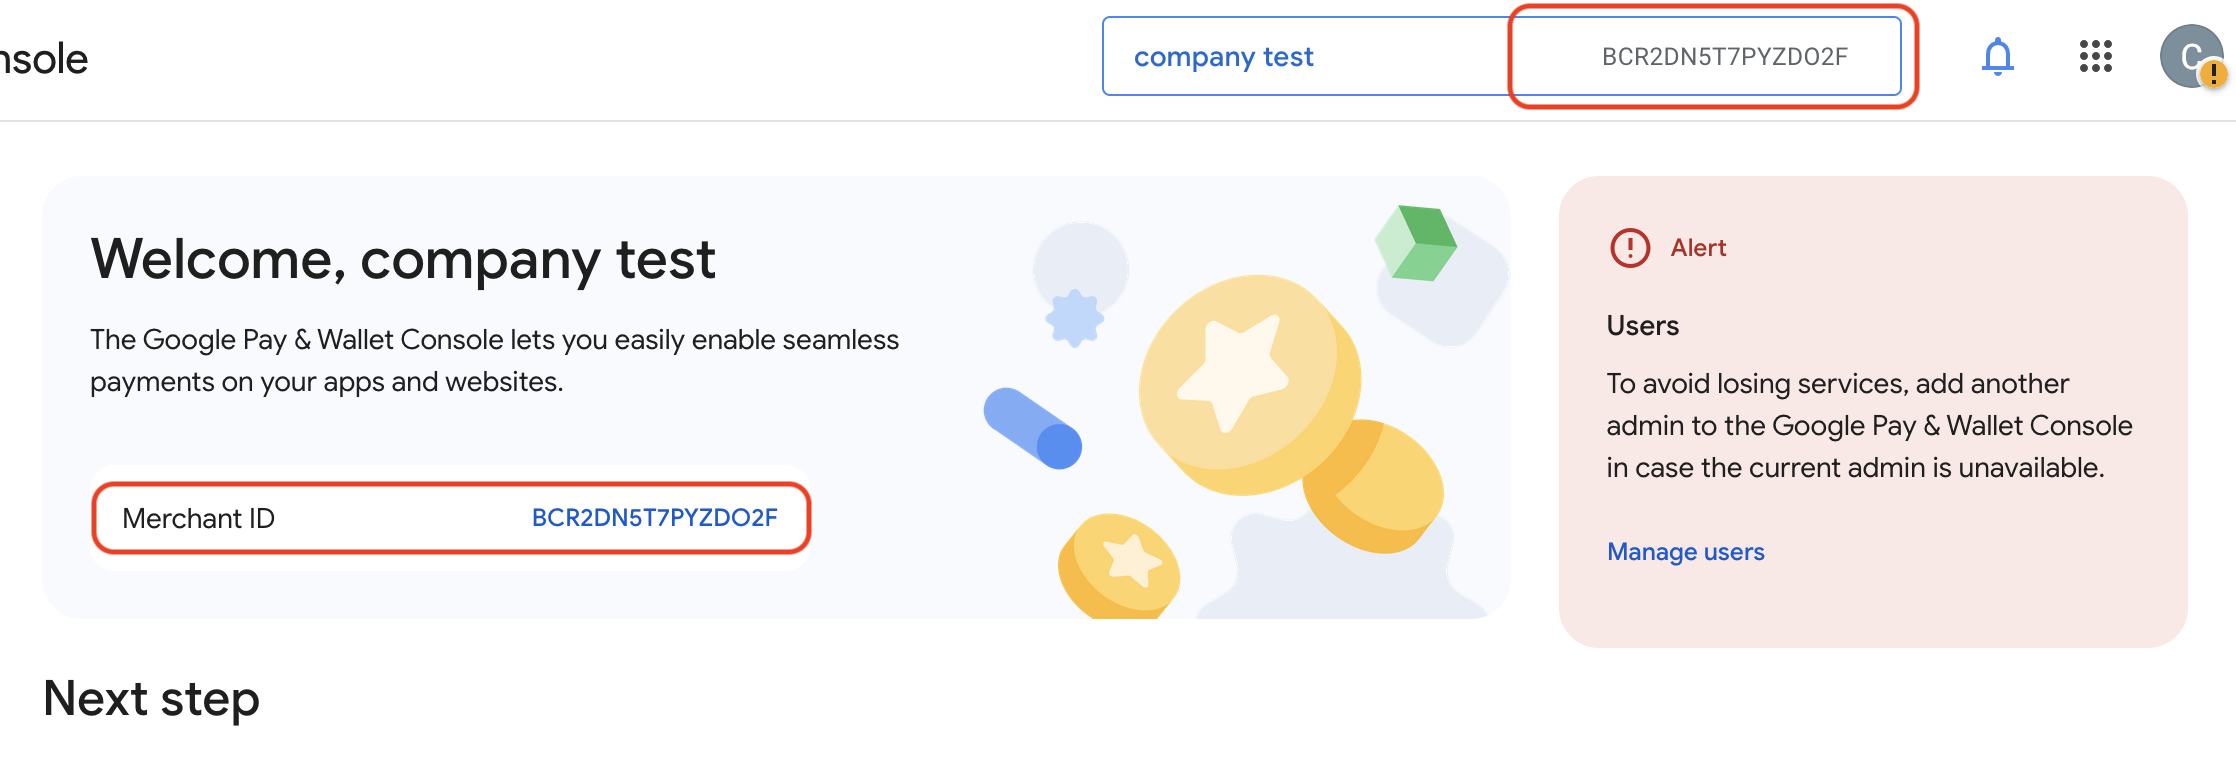
The Google Pay Merchant ID is a unique identifier for your business. It is displayed at the top of the Dashboard next to your business name and can also be found by clicking on your business name.
3. Complete the Business Profile
The Business Profile is accessed from the Dashboard by clicking the "Business Profile" tile. It has two sections:
Business Identity
Set up a payments profile to identify your business across Google:
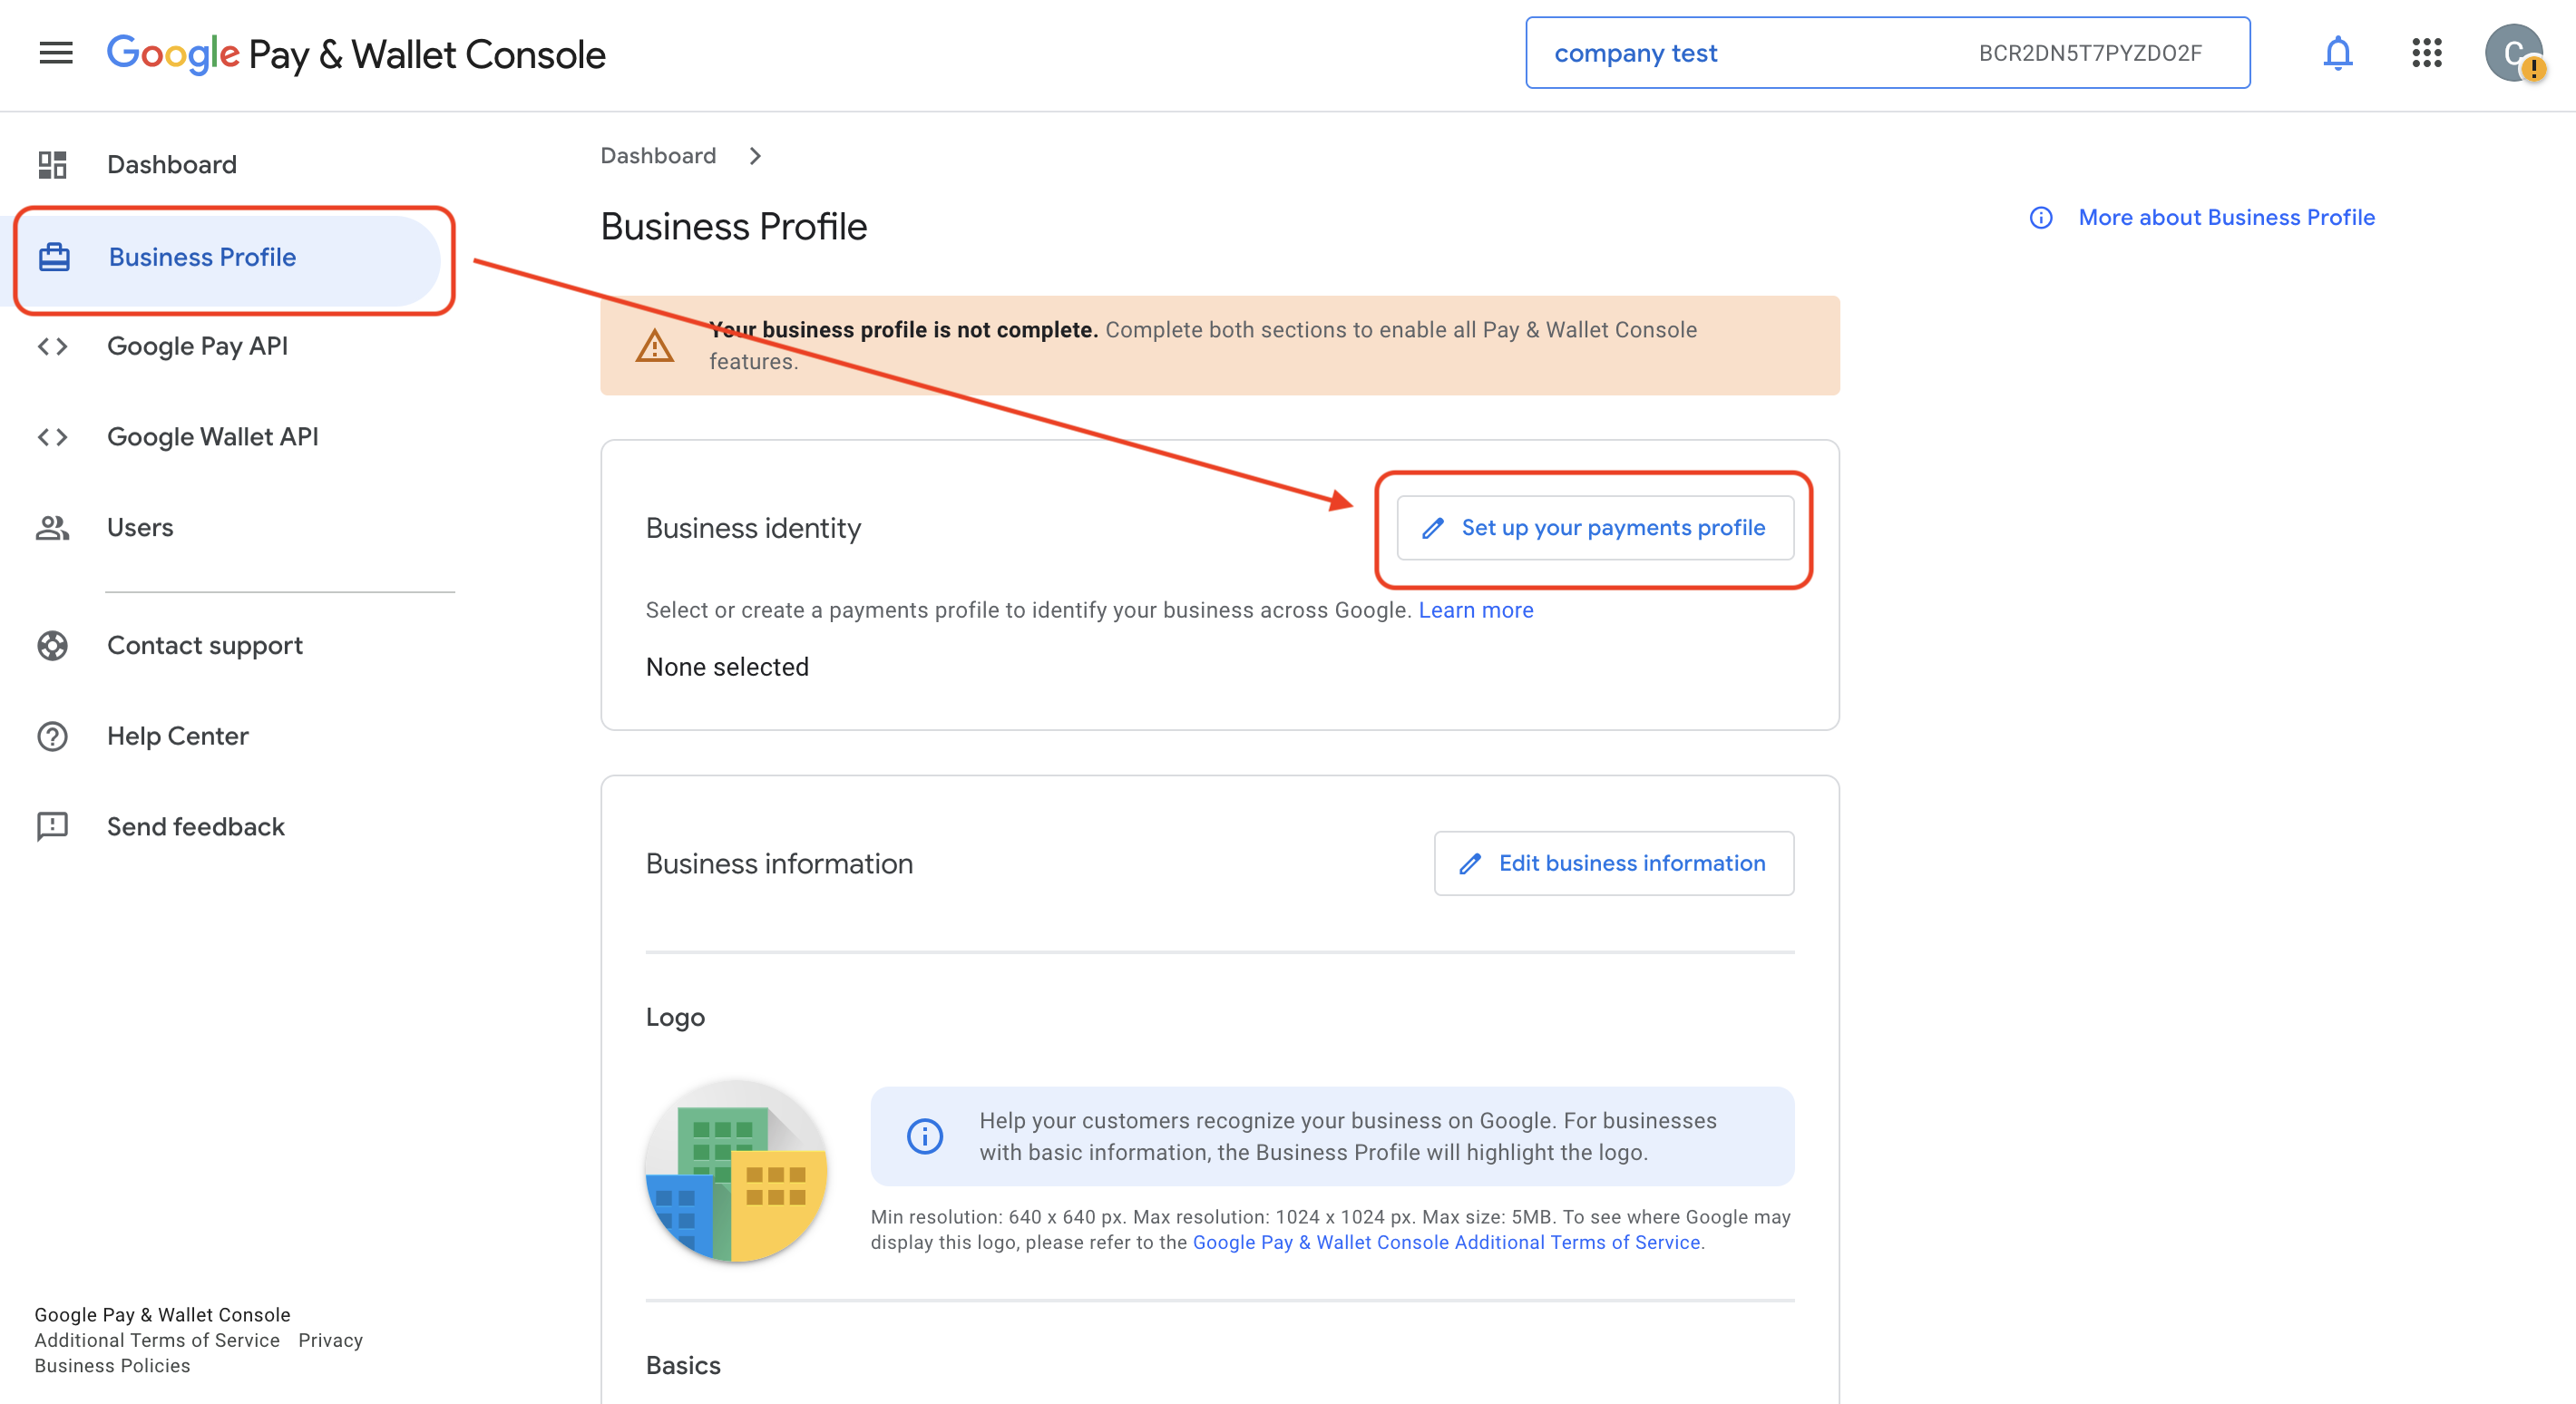
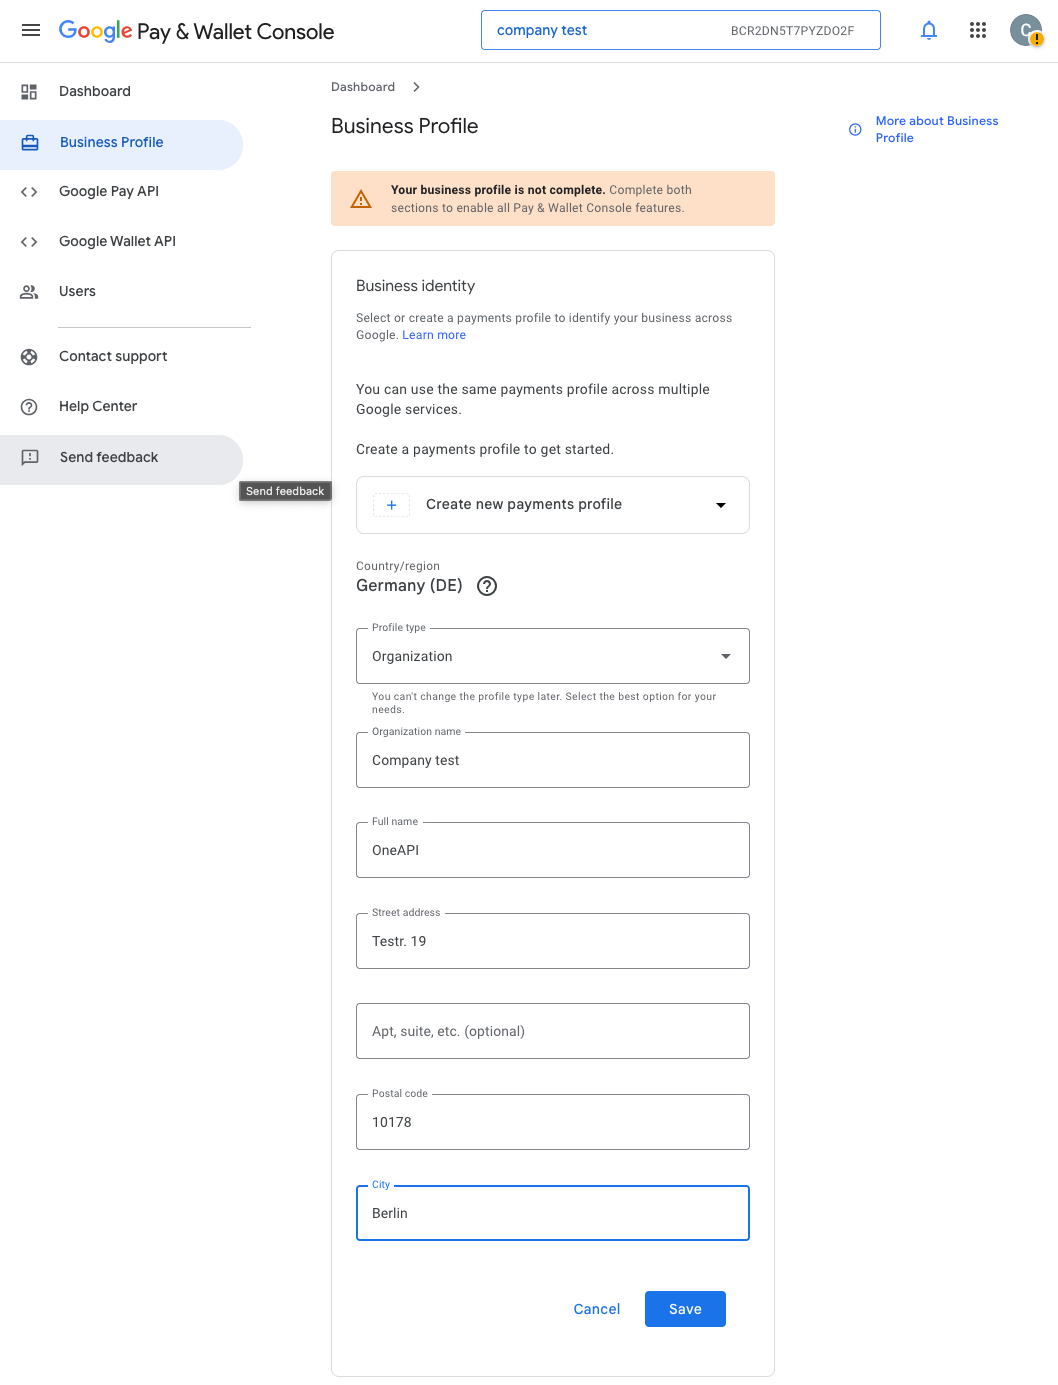
If a payments profile already exists in your Google account, you can reuse it. Otherwise, create a new one.
Business Information
Edit the business information fields:
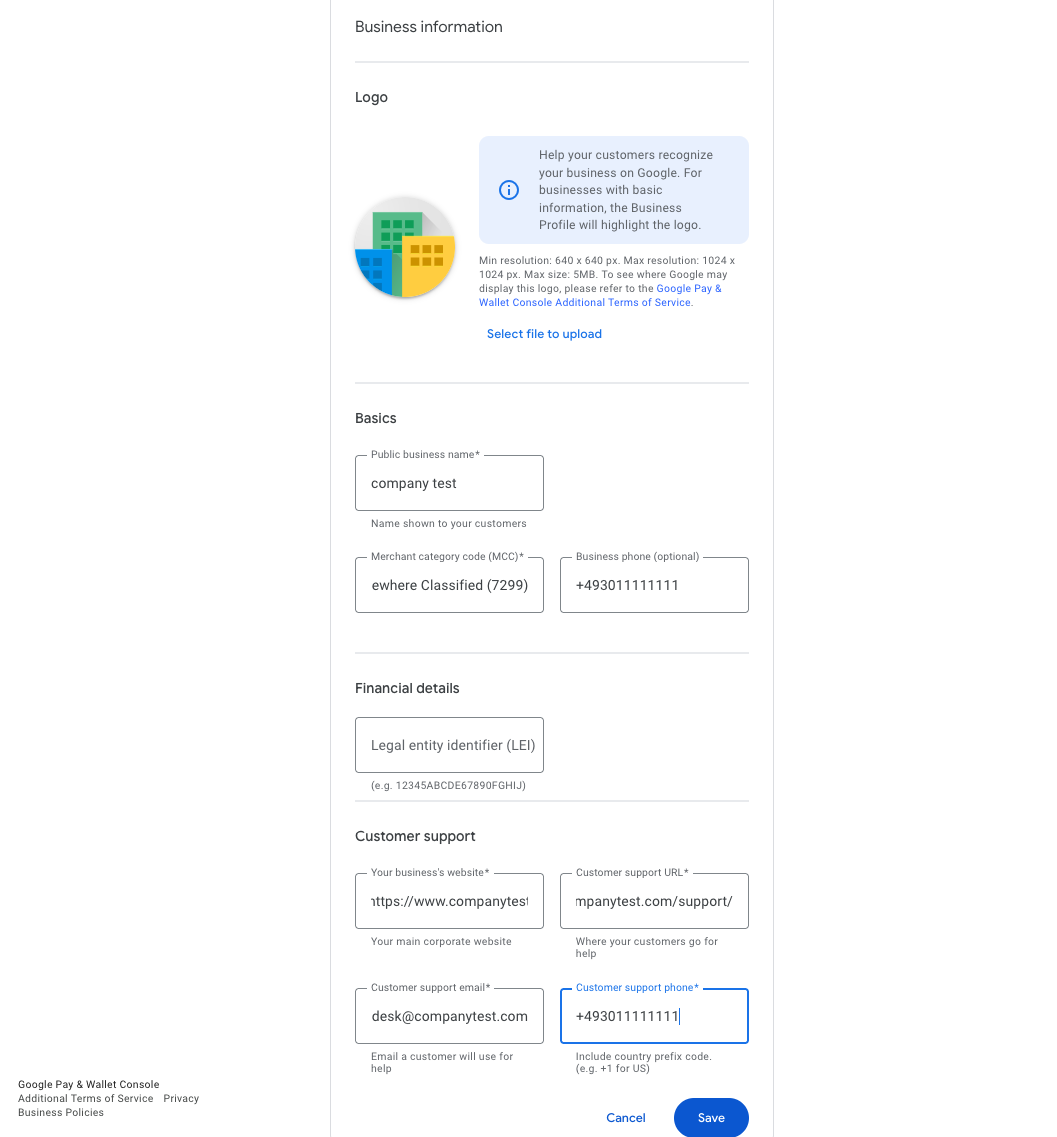
Once the payments profile is created and the business information is sufficiently complete, the profile will be reviewed and approved by Google. The approval status is displayed at the top of the Business Profile page.
4. Integrate the Google Pay API
The Google Pay API can only be integrated once the merchant has a website or app that uses Google Pay for payments. The buyflow (purchase flow) must be developed before completing this step.
Required buyflow screenshots
Google requires screenshots of the following stages of your purchase flow:
- Item selection — When a user is browsing an item or service.
- Pre-purchase screen — When a user is ultimately ready to make a purchase.
- Payment method screen — When a user selects Google Pay as their payment method.
- Google Pay API payment screen — When a user is shown the payment info they have saved to Google Pay.
- Post-purchase screen — When a user has made a successful purchase.
Steps to integrate
- In the Google Pay & Wallet Console Dashboard, click "Google Pay API".
- Select "Web integration" to add a website.
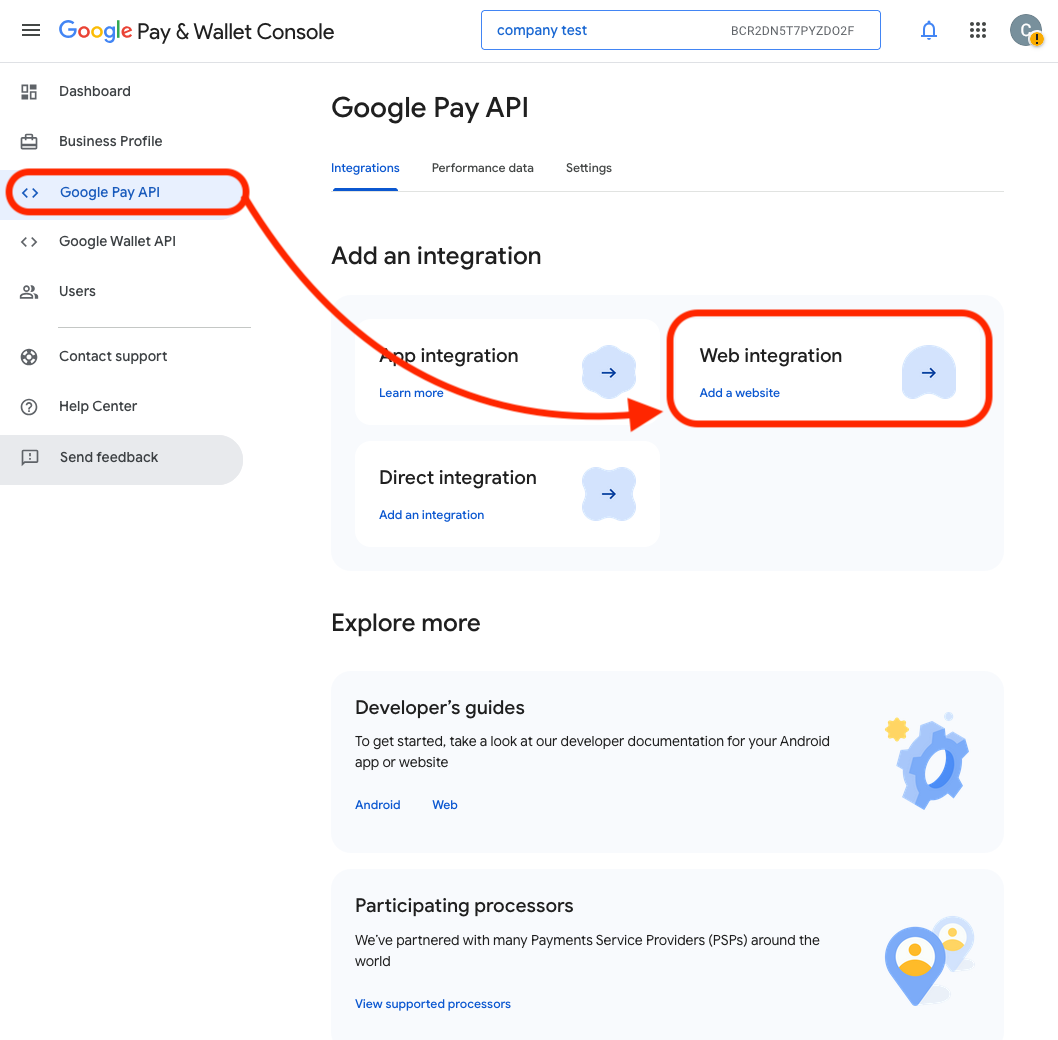
- On the "Web integration" page, provide:
- Website URL — Enter the full domain (HTTPS required). This must be the complete subdomain of the website, not just the top-level domain (no redirects). If the shop is available on multiple domains (e.g. multiple languages), repeat this step for each domain.
- Integration type — Select "Gateway". The list of supported payment providers under "our supported Payment Service Providers (PSPs)" contains our platform.
- Buyflow screenshots — Upload screenshots for each of the 5 required stages listed above.
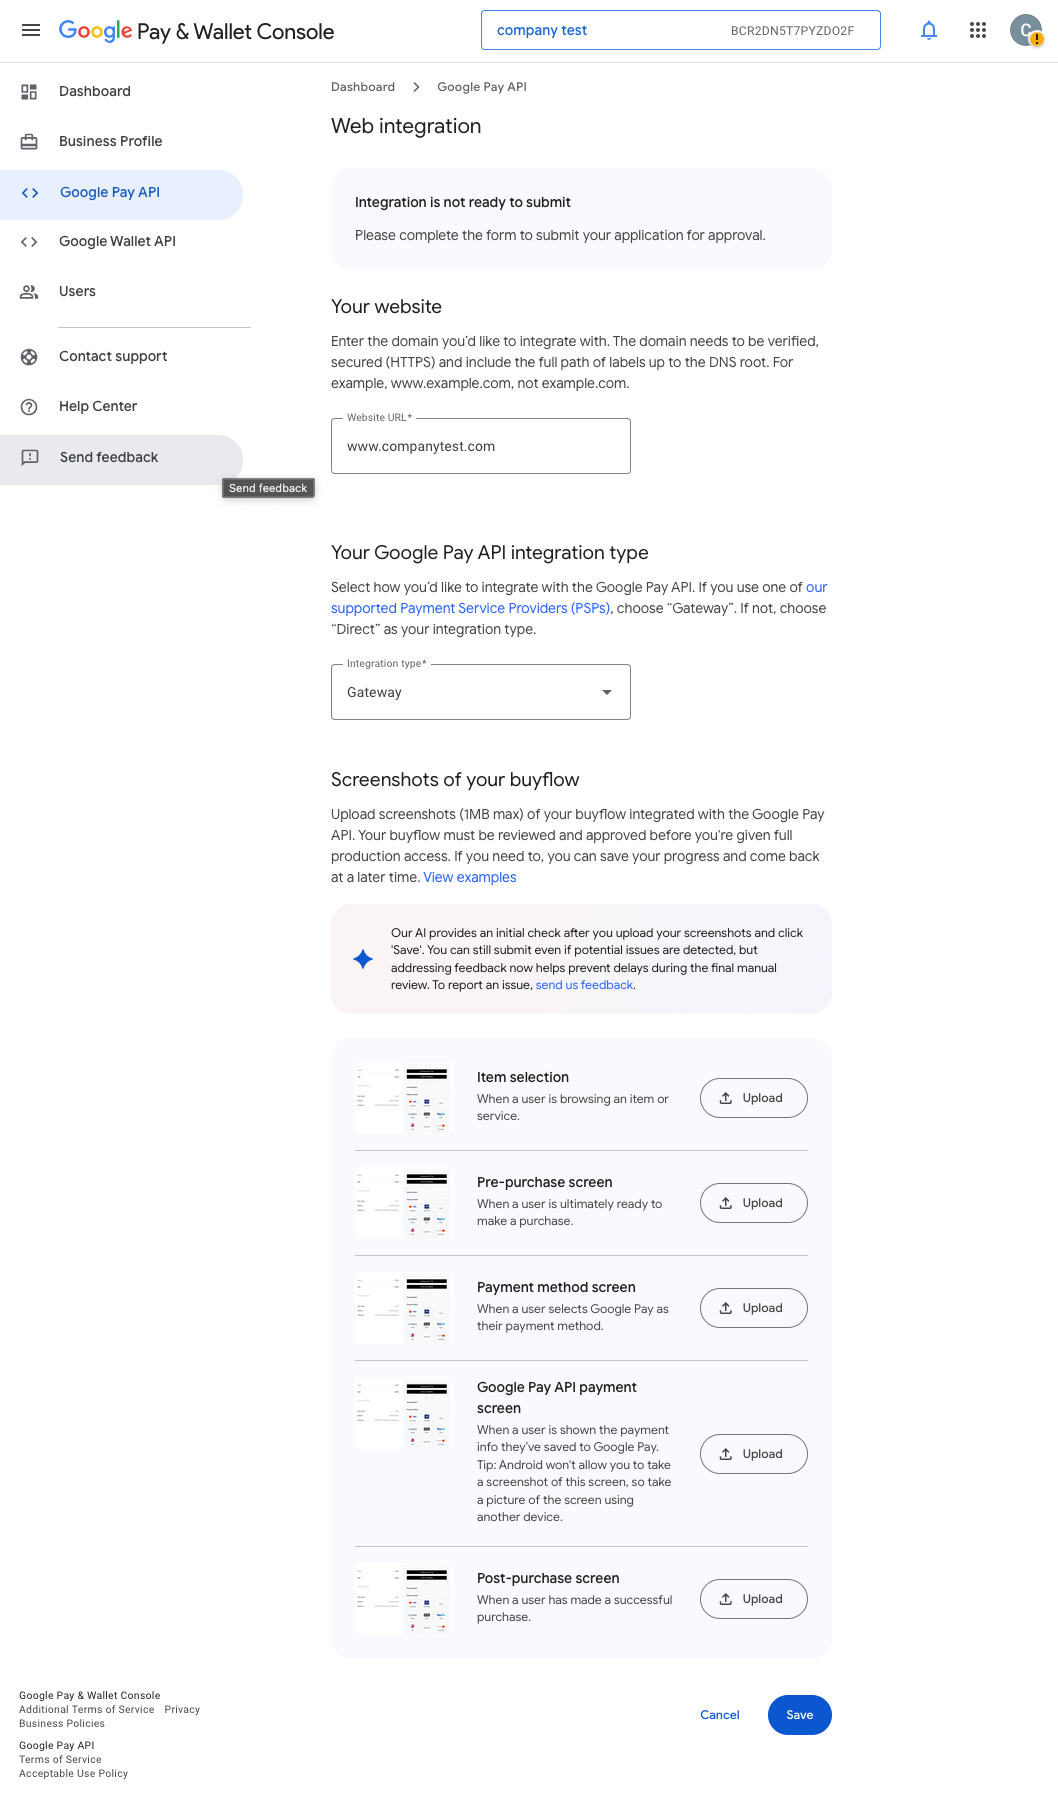
- Save your progress at any point — intermediate states are preserved.
- When all information is complete, the page displays "Integration is ready to submit". Click "Submit for approval" to request Google's approval.
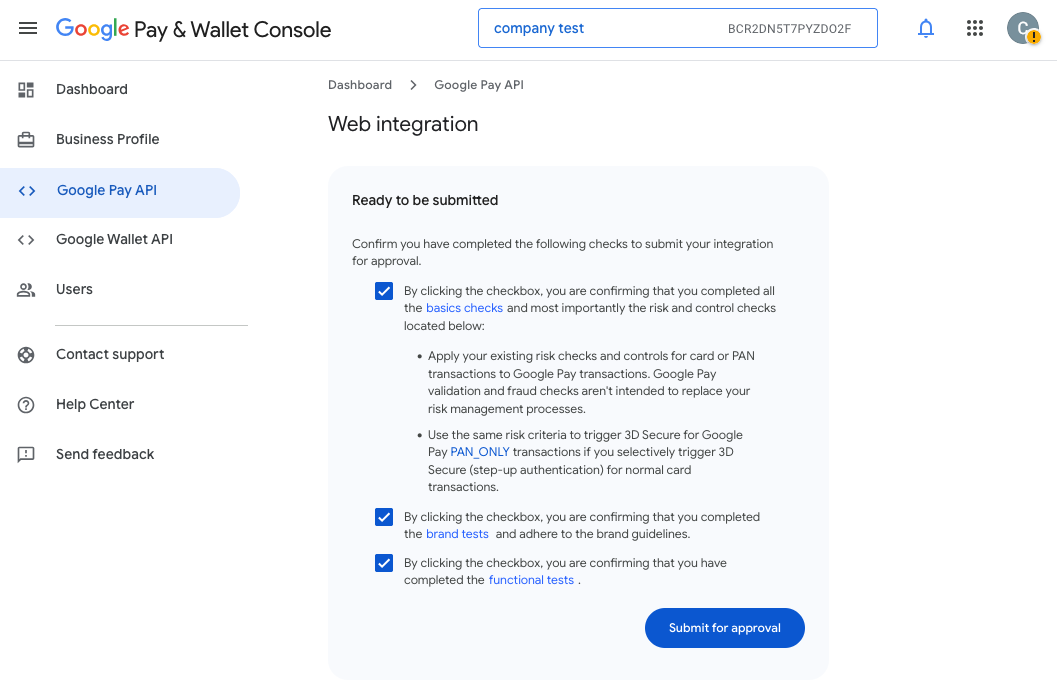
The exact click-flow and details of the integration process may change over time as Google updates their console. The steps above reflect the process as of the time of writing.
Once approved, you can process live Google Pay transactions. Note that approvals may take several days.
Frontend Integration
To display the Google Pay button and collect payment data, the merchant must integrate the Google Pay API on their frontend. Follow the official documentation for your platform:
Include the Google Pay API library
For web integration, include the Google Pay API JavaScript library in your page:
<script src="https://pay.google.com/gp/p/js/pay.js"></script>
Key configuration objects
The following objects are required when configuring the Google Pay API on your frontend:
merchantInfo
Identifies the merchant to Google Pay. The merchantId is the ID obtained from the Google Pay Business Console during the sign-up process.
const merchantInfo = {
  merchantId: "YOUR_GOOGLE_MERCHANT_ID",
  merchantName: "Your Shop Name"
};
allowedPaymentMethods
Defines which card networks, authorization methods, and tokenization configuration are used. The gateway is provided by our platform during onboarding, and the gatewayMerchantId value represents the merchant-specific identifier in your system.
const allowedPaymentMethods = [{
  type: "CARD",
  parameters: {
    allowedAuthMethods: ["PAN_ONLY", "CRYPTOGRAM_3DS"],
    allowedCardNetworks: ["VISA", "MASTERCARD"]
  },
  tokenizationSpecification: {
    type: "PAYMENT_GATEWAY",
    parameters: {
      gateway: "provided_by_OneAPI",
      gatewayMerchantId: "merchant_id_in_your_system"
    }
  }
}];
Handling the Google Pay token
When the customer successfully authenticates, the Google Pay API returns a paymentData object containing the encrypted token. This token must be sent to your backend and then forwarded to our Payment API (see Server-to-Server Direct Processing below).
For the complete frontend integration guide — including button rendering, paymentData handling, and brand guidelines — refer to:
- Web: Google Pay Web tutorial and Web brand guidelines
- Android: Google Pay Android tutorial and Android brand guidelines
How it works
- Customer initiates a transaction on the merchant's website or app.
- Merchant displays the Google Pay button on their frontend.
- Customer clicks the Google Pay button and authenticates via their Google account.
- Google returns an encrypted payment token to the merchant.
- Merchant decrypts the token and extracts the card data.
- Merchant sends the card data to OneAPI via the Payment API (Server-to-Server).
- OneAPI returns the transaction result.
- OneAPI sends a webhook notification to the merchant's
postback_url. - Merchant updates order status and displays final confirmation to the customer.
Payment Flow (Unmanaged)
Server-to-Server Direct Processing
There are two possible flows depending on the availability of the wallet cryptogram:
1. With wallet cryptogram (no 3DS required)
When the decrypted Google Pay token contains a cryptogram (CRYPTOGRAM_3DS authorization method), pass it along with the card data. No 3DS authentication is needed.
payment_typeStringrequiredgooglepayorder_idStringrequiredamountFloatrequiredcurrencyStringrequiredpostback_urlStringrequiredsuccess_urlStringrequirederror_urlStringrequiredcard_numberStringrequiredcard_holderStringrequiredcard_expiry_monthStringrequiredcard_expiry_yearStringrequiredthreeds_wallet_cryptogramStringrequiredthreeds_wallet_cryptogram_eciStringcard_entry, charge_order, clearing_mode, clear_after, and sca_exemption_request are also accepted in this flow. See the Create Payment API reference for the full list of supported parameters.POST /rest/payment
Authorization: Basic <base64(api_key:api_password)>
Content-Type: application/json
{
"payment_type": "googlepay",
"order_id": "GPAY-12345",
"amount": "25.90",
"currency": "EUR",
"postback_url": "https://your-postback.url.com",
"success_url": "https://your-success.url.com",
"error_url": "https://your-error.url.com",
"card_number": "4761070000000509",
"card_holder": "John Doe",
"card_expiry_month": "12",
"card_expiry_year": "2026",
"threeds_wallet_cryptogram": "AgAAAAAABk4DWZ4C28yUQAAAAAA=",
"threeds_wallet_cryptogram_eci": "07"
}
Payment API Response
transaction_idStringpayment_typeStringstatus_codeIntegerstatusStringorder_idStringmessageStringincluded_feesStringerror_codeInteger{
"transaction_id": "d1bf9fdf-7268-406f-9e08-8d5a9540ab97",
"payment_type": "googlepay",
"status_code": 3,
"status": "completed",
"order_id": "GPAY-12345",
"message": null,
"included_fees": "0.00",
"error_code": 0
}
2. Without wallet cryptogram (3DS required)
When the cryptogram is not available (PAN_ONLY authorization method), 3DS authentication must be performed. If the merchant has their own MPI (Merchant Plug-In) for 3DS, they can pass the 3DS authentication results directly and the gateway will skip its own 3DS verification. Otherwise, the gateway will perform 3DS authentication.
payment_typeStringrequiredgooglepayorder_idStringrequiredamountFloatrequiredcurrencyStringrequiredpostback_urlStringrequiredsuccess_urlStringrequirederror_urlStringrequiredcard_numberStringrequiredcard_holderStringrequiredcard_expiry_monthStringrequiredcard_expiry_yearStringrequiredthreeds_authentication_valueStringthreeds_directory_server_trans_id, the gateway will skip its own 3DS verification.threeds_directory_server_trans_idStringthreeds_authentication_value.threeds_authentication_value and threeds_directory_server_trans_id are provided, the gateway will skip its own 3DS verification. Otherwise, the gateway will perform 3DS authentication automatically. The optional processing parameters from Cardholder Data Parameters such as card_entry, charge_order, clearing_mode, clear_after, and sca_exemption_request are also accepted in this flow.POST /rest/payment
Authorization: Basic <base64(api_key:api_password)>
Content-Type: application/json
{
"payment_type": "googlepay",
"order_id": "GPAY-67890",
"amount": "25.90",
"currency": "EUR",
"postback_url": "https://your-postback.url.com",
"success_url": "https://your-success.url.com",
"error_url": "https://your-error.url.com",
"card_number": "4761070000000509",
"card_holder": "John Doe",
"card_expiry_month": "12",
"card_expiry_year": "2026",
"threeds_authentication_value": "MDAxMDAxMDAxMDAxMDAxMDAxMDA=",
"threeds_directory_server_trans_id": "f25084f0-5b16-4c0a-ae5d-b24e2f921514"
}
Payment API Response
With MPI (direct)
When threeds_authentication_value and threeds_directory_server_trans_id are provided, the gateway skips its own 3DS verification and the response is direct:
transaction_idStringpayment_typeStringstatus_codeIntegerstatusStringorder_idStringmessageStringincluded_feesStringerror_codeInteger{
"transaction_id": "938834bc-769f-44e7-ab25-da9aeaad5346",
"payment_type": "googlepay",
"status_code": 3,
"status": "completed",
"order_id": "GPAY-67890",
"message": null,
"included_fees": "0.00",
"error_code": 0
}
Without MPI (3DS required)
When the 3DS parameters are not provided, the gateway triggers its own 3DS flow. The response will have status: "pending" and a client_action that the merchant must handle:
transaction_idStringpayment_typeStringstatus_codeIntegerstatusStringorder_idStringmessageStringincluded_feesStringerror_codeIntegerclient_actionStringaction_data) or redirect (redirect to the url in action_data).action_dataObjecturl (target URL of the action) and, in case of a postForm, fields (key/value pairs of the data to be posted).fields to the provided url in action_data. This will redirect the customer to the 3DS authentication page. Once 3DS is completed, the customer is returned to the merchant's success_url or error_url.{
"transaction_id": "4037b0b4-271b-4486-b7b0-a4569c9ebe40",
"payment_type": "googlepay",
"status_code": 2,
"status": "pending",
"order_id": "123000",
"message": null,
"additional_transaction_data": null,
"amount": 10.0,
"included_fees": "0.00",
"error_code": 0,
"client_action": "postForm",
"action_data": {
"url": "https://3ds-acs-url.example.com/v1/acs/challenge-initiate",
"fields": {
"creq": "eyJ0aHJlZURTU2VydmVyVHJ..."
}
}
}
Compliance and Branding
Merchants using Google Pay must comply with:
Postbacks
For the full list of payment postback fields, see the Payment API. For retry policy and signature verification, see Postbacks.
Test Data
To learn how to add test cards for testing Google Pay, please review the official Google Pay test documentation.
Unmanaged Integration Test Data
For testing unmanaged (Server-to-Server) Google Pay transactions, use the following test data.
The card data in unmanaged Google Pay transactions is actually token data (DPAN), not the real card number — but it follows the same format. CVV is not required for wallet token transactions.
3DS is more common for Google Pay than for Apple Pay, especially when using the PAN_ONLY authorization method where no cryptogram is available.
Scenario 1 — With Cryptogram (instant completion)
The transaction will go straight to completed status.
| Parameter | Test Value |
|---|---|
threeds_wallet_cryptogram | Af9x2zAAAAABBBCC1XYCMAABAAA= |
threeds_wallet_cryptogram_eci | 05 |
card_number | 5286940020000908 |
card_holder | Max Mustermann |
card_expiry_month | 12 |
card_expiry_year | 2026 |
Scenario 2 — Without Cryptogram (3DS required)
Omit threeds_wallet_cryptogram. This triggers a 3DS flow. To complete the transaction, either:
- Option A — Pass merchant-side 3DS data:
| Parameter | Test Value |
|---|---|
threeds_authentication_value | AUTHENTICATION_VALUE |
threeds_directory_server_trans_id | 54c64c00-eef8-4a8b-af44-fee8cc57e530 |
- Option B — Complete the
client_actionreturned in the response (postFormorredirect) to continue with the acquirer-provided 3DS flow.